Quantcast
Channel: Reality matters
Viewing all 184 articles
Browse latest View live

Estimote Indoor Location positioning achieves 30 cm precision thanks to ARKit

$
0
0

At Estimote, we’ve built our first beacon before iBeacon was announced. And then, as soon as Apple showed iBeacon to the world, we were the first to integrate with it, leveraging the superior iBeacon stack that Apple built directly into iOS. Thanks to that integration, developers building with Estimote gained access to features like always-on background monitoring, or ability to relaunch their app from a killed state due to a beacon event.

Then, in 2014, we launched our Indoor Location SDK, taking even more advantage of iOS APIs: Core Bluetooth and the sensors APIs. Developers now had access not only to proximity to beacons, but to a precise (x,y) indoor position.

Today, we’re further advancing our integration with the iOS stack by adding ARKit to the mix. Our Indoor SDK can now leverage Apple’s breakthrough image-processing and sensor fusion, to strengthen its own indoor positioning algorithms. The result of that integration is an inch-level indoor positioning precision.

Indoor Location takes ARKit to the next level

ARKit is new technology from Apple added in iOS 11, making it super easy for developers to build Augmented Reality experiences, and blend the physical and digital worlds on an iPhone screen. Never before could you look at the physical world through your phone and see it populated with creatures from games and fantasy movies. Or see what your apartment would look like, fully furnished, without buying a single piece of furniture. And that’s just the tip of the iceberg!

When developing for augmented reality, you could encounter a few problems. Your phone doesn’t really know where it is. Is it a conference room or a lobby in your office? It doesn’t even know if this is the same place you last ran the app. Because of that, it’s hard for ARKit to place objects in the same spot every time you run the app, or show the same object in the same place for two different users.

Indoor Location delivers the context of the physical world to the phone, whether it’s in the lobby or the conference room, solving both the problem of session sharing as well as session persistence. If you place a 3D castle next to your chair, it will still be there the next time you run the app. What’s more, Indoor Location provides the option to have a back-end for AR. Because the device and your CMS can now speak the same language, you can remotely store and manage where the objects should be.

Try it now!

All you need to try it out is a single dev kit of Location Beacons with UWB to map your location, and an iOS device compatible with ARKit, such as an iPhone 6s or newer (for the iPad family: an iPad Pro or iPad 2017) with iOS 11 installed. Download the Estimote Indoor Location app, map your space, and enjoy the most precise positioning on the market!

Buy Indoor Location dev kit
Includes 4 × Location Beacons with UWB and automapping

Thrilled to write your own app?

We’ve prepared a fast track for you! A ready-to-go, but easy-to-expand example is bundled within our SDK. All you need to do is put in your credentials and location identifier, and you’re all set!

Happy hacking!


The most reliable Proximity tech, now with a brand-new Proximity SDK

$
0
0

Designing magical experiences for your customers in the smartphone area is inseparably tied with creating a mobile application that is aware of a user’s context. You could use a museum application (e.g Guggenheim), for instance, to push content to a visitor depending on what artwork they are closest to. A shop application (e.g Tesco) could send your guests discounts, coupons, and special promotions based on information about the department that the shopper is in. The list goes on, but all of these use cases prove that beacon technology is a great solution to bind the physical world (shops, departments, exhibits) with mobile applications — by providing proximity information. At Estimote, we want to make sure you succeed in creating context aware applications, which is why today we are officially launching Proximity SDK for iOS and Android.

Yes, this means that Estimote Monitoring, the most reliable notification solution, is now available on Android.

proximity_gif

Proximity SDK provides context to your apps in a super-easy way. You no longer need to spend time on understanding either beacon physics or different packet types to correctly react to users’ moving around your venue. With this SDK we want to let you build on our experience in recognizing the right context, to let you focus on creating magical experiences for the users of your app.

Why should you use it?

  1. Reliability. To make sure that you are always capable of consuming a user’s proximity in a predictable, reproducible manner

  2. Ease of use. Proximity SDK is focused on using beacon signals easily and providing a reliable app experience. That’s all it does.

Reliability

Under the hood, Proximity SDK uses Estimote Monitoring, Estimote’s algorithm for more reliable enter/exit reporting. This full stack solution, originating from the beacons’ hardware, continuing with their firmware and handled by the mobile SDK, provides enter and exit notifications where and when you really expect them.

We have verified that our solution lets us achieve amazing results and that is why we have enabled it by default in Estimote Beacons and built the Proximity SDK upon Estimote Monitoring.

We are happy to also announce that Proximity SDK brings the most reliable notification solution to Android phones! We now provide a consistent experience on iOS and the most popular Android phones, updated to work smoothly with the latest release of Android OS.

Ease of use

With Proximity SDK, you’re getting a short and consistent API that is:

  • easy to learn - you won’t need to spend much time to understand and get familiar with it.

  • sufficiently powerful - SDK contains functionality that you will actually need, no less and no more.

proximity_office

Our experience with proximity deployments helped us design an API which works well in many situations. For example, it may be convenient to assume there’s always just one beacon nearby, but in real-world conditions, signals can overlap, interfere with one another, etc. Our new API is designed to help you gracefully handle those situations, and make your beacon integration successful despite the complexities of the radio waves and the physical world.

Due to these advantages in our API, it will be easy for you to use and integrate Proximity SDK into your own app.

Attachment-based identification

Details of each of your Estimote devices are available in Estimote Cloud. Each device has a unique identifier, but remembering it and using it for every one of your devices can be challenging. This is why Proximity SDK uses attachment-based identification. Imagine you have two beacons, and in Estimote Cloud you tag them with an attachment/JSON: one as blueberry_desk, one as mint_desk, and both as venue = office.

In the SDK, you can now say, “monitor for the blueberry_desk and tell me when I enter and exit its proximity” and “monitor for venue, tell me when I enter/exit its proximity and which venue that is”

proximity_json

Here’s how you can do this using our iOS SDK

ESTCloudCredentials.setUpSharedInstance(appID: yourAppIDGoesHere, appToken: yourAppTokenGoesHere)
self.proximityObserver = ESTProximityObserver(credentials: ESTCloudCredentials.shared!, errorBlock: { error in
    print("Ooops! \(error.localizedDescription)")
})

let blueberryZone = ESTProximityZone(range: ESTProximityRange.custom(desiredMeanTriggerDistance: 0.5)!,
                                        attachmentKey: "blueberry_desk")
blueberryZone.onEnterBlock = { attachment in
    print("Currently, you are within blueberry_desk zone")
}
blueberryZone.onExitBlock = { attachment in
    print("You are no longer within blueberry_desk zone")
}

let midVenueZone = ESTProximityZone(range: ESTProximityRange.custom(desiredMeanTriggerDistance: 1.5)!,
                                    attachmentKey: "venue")
midVenueZone.onEnterBlock = { attachment in
    print("Currently, you are within venue zone")
}
midVenueZone.onExitBlock = { attachment in
    print("You are no longer within venue zone")
}

self.proximityObserver.startObserving([blueberryZone, midVenueZone])

And our Android SDK

proximityObserver = ProximityObserverFactory().create(applicationContext, EstimoteCloudCredentials(YOUR_APP_ID, YOUR_APP_TOKEN))
val proximityRule0 = proximityObserver.ruleBuilder()
        .forAttachmentKey("blueberry_desk")
        .withOnEnterAction{
            attachment ->
            print("Currently, you are within blueberry_desk zone")
        }
        .withOnExitAction{
            print("You are no longer within blueberry_desk zone")
        }
        .withDesiredMeanTriggerDistance(0.5)
        .create()

val proximityRule1 = proximityObserver.ruleBuilder()
        .forAttachmentKey("venue")
        .withOnEnterAction{
            attachment ->
            print("Currently, you are within venue zone")
        }
        .withOnExitAction{
            print("You are no longer within venue zone")
        }
        .withDesiredMeanTriggerDistance(1.5)
        .create()

proximityObserver
        .addProximityRules(proximityRule0, proximityRule1)
        .withBalancedPowerMode()
        .startWithSimpleScanner()

Another benefit of this approach is that when you change your mind and want to replace one beacon with another, all you need to do is reassign JSON attachments in Estimote Cloud. You don’t even need to connect to the beacon or rebuild the app!

Software-defined range

Proximity SDK lets you “consume” beacon signals at different ranges. The range where you get the notification doesn’t depend on packet broadcasting power anymore — you can even use a single beacon to trigger notifications at far, medium and near ranges. Previously, you would probably use a beacon per range (three in this example).

Give it a try and let us know what do you think!

You can find Proximity SDK for both iOS and Android on Github with sample apps that help you get started.

Share your thoughts on our forums or drop us an email

The Memphis Music Scene. Booming with the blues, innovated with Estimote.

$
0
0

Memphis, Tennessee. Home to some killer barbeque, Elvis Presley and the Graceland estate, and the Memphis Grizzlies. Most notably though, it’s the birthplace of rock and roll! And Memphis isn’t shy about representing that badge of honor. There’s no shortage of stops to soak in all the appreciation of rock, soul, and blues. Two of these exhibits in particular are boasting unique and technically advanced solutions, pinging their visitors with contextual content viewable on their personal smartphones. And yep, you guessed it! They’re both powered by Estimote.

enter image description here

ThinkPROXI is a proximity platform built to connect businesses with their customers. They started up in 2015, supporting various proximity protocols like NFC, GPS, iBeacon, and EddyStone. Once they realized the value of proximity marketing and it’s potential in museums, real estate, and retail, they focused their platform on these domains. With their home base set in Memphis, it was only natural to bounce into the music scene with their smart city and museum apps.

The Memphis Music Hall of Fame The folks at the Memphis Music Hall of Fame were interested in engaging with their visitors of all ages in a new and exciting way. By their own research, the National Endowment for the Arts recently reported a sharp decline in museum-going rates among young adults in their 20s and 30s. The Music Hall of Fame said, “Heck with that!” They connected with ThinkPROXI, who put together a remarkable solution to intrigue millenials.

Key exhibits are assigned an Estimote beacon (nearly 40 altogether), pushing artist and artefact relevant media via the Memphis Music Hall of Fame app. Want to know more about B.B. King, Ann Peebles, or the Reverend Al Green? Listen to an audio guide, or a musical snippet to jog your memory. Johnny Cash fan? There’s memorabilia everywhere, with his handwritten lyrics out on display. If you want to learn more, your trusty app will act as your own personal guide, taking you around the area and providing background on what your eyes are feasting upon. And to add another layer of cool, they’re profiling visitors by asking them a few questions from the start. This profiling enables the app solution to give a completely different experience, depending on your interests. A couple of key features ThinkPROXI has enabled are social sharing, selfies, likes, and capturing comments. And, actionable insights are collected as visitors are engaging with the beacons, making moves based on demographics and other criteria. It’s like an assistant giving you a VIP customized ride!

Take a walk down Beale Street Beale Street is a wonderland of attractions, rich with history. It was a significant landmark in the Civil Rights Movement, as Beale Street was the home to an NAACP co-founder, an anti-segregationist paper, and the oldest surviving African-American Baptist church in Tennessee. Blues legends Muddy Waters, Louis Armstrong, and B.B. King all performed on Beale Street in their heyday. Walking down the open boulevard, you can practically feel the rhythm guitar kicking up your feet.

It’s no doubt one of the most popular places for tourists in the United States, drawing in millions of pedestrians a year. ThinkPROXI has installed nearly 100 Estimote beacons along the route of historical buildings and local businesses to provide a virtual tour guide application. The Beale Street App guides visitors in a walking tour, complete with information about every building and the history behind it. The clean design is intended to educate in a fun and engaging way with audio, video, and infographics. Apart from the historical buildings tour, the app additionally gives contextual updates from the local businesses, providing coupons and special offers to it’s users. These campaigns are tailored to visitor demographics, with businesses opting in accordingly to design something specific to their needs.

Beale Street App screens

Key parts of the Estimote stack in making this solution a success include Estimote Cloud along with the Beacon Health Check feature, as well as Estimote’s Configuration app. Of course, building a solution of this scale isn’t without it’s hurdles. Buildings on Beale St are very close to each other. It was very challenging to use one beacon per building. The team at ThinkPROXI arrived at an answer using GPS and beacons in combination to support multiple building navigation. Going forward, our latest Proximity SDK would be perfect!

In their next iteration, Sridhar Sunkara and Sanjeev Bora, CEO and CTO of ThinkPROXI respectively, have expressed an interest in moving toward wayfinding and user positioning using our Indoor Location SDK. Be sure to keep an eye on these Memphis heros as they continue to push solutions that educate the public, while engaging in a fun and fresh way! And don’t forget to download their apps from the App Store before you head to Memphis next.

Download the Beale Street App / / Download the Memphis Music App

Written by Jess Anderson, Content Creator + Community Manager @ Estimote

Estimote introducing Low Power Asset Tracking API

$
0
0

At Estimote, we keep adding building blocks for truly intelligent locations. Our vision of the future involves workplaces and offices that make lives easier, thanks to a sophisticated mixture of sensors, location algorithms, and communication over low-power mesh networks. Today, we’re adding another layer on top this strong foundation. We want to introduce you to Estimote’s Asset Tracking API.

Routed mesh network

This technology allows you to create an asset tracking solution in a matter of hours, not days, with elements of our stack you likely already have.

Why are we building Asset Tracking technology?

Asset Tracking API is an answer to real life problems. We hear a lot about them from our community. This kind of technology can be used in a factory to track the position of particular hardware or, say, at an assembly line where plane components have to be found and installed in an extremely efficient manner. Another interesting real-life example is tracking medical equipment at hospitals. We know that efficiency in locating crucial tools is a good way to save time and money from day one.

Asset tracking plane

We attempted to tackle this problem earlier, with an initial version of asset tracking based on our beacons with Indoor and Nearables. Even in that first version, we had no need for gateways and wires. That doesn’t mean it was perfect: the core principle was the same (track the placement of a Nearable using beacons), but there was much more overhead in the process. In practice, it only collected data about the Nearables’ placement when an Internet-connected device with an app was around. This meant that someone had to walk around the entire space quite frequently, or the Nearables’ position wouldn’t be updated. Naturally, this wasn’t good enough for us long term. We wanted to take things further, and build something smarter.

Estimote’s new way of tracking assets

We began with a very specific focus, the same we have for our mesh networking: low power usage. We built Asset Tracking on top of our low-power BLE mesh, in fact. It’s cheaper and easier to deploy—and to maintain, since there’s no power supply needed at any point of the entire process.

How does it work?

It’s actually pretty simple: take some Estimote Stickers and place them on the items you’d like to track. They need to be within range of a single Location beacon or in a location that’s mapped using Location beacons. The only requirement is that you have firmware 4.13.2 or newer installed on the Location Beacons with F3.3 or I1.2 hardware version.

Asset Tracking Configuration

After a straightforward, cloud-based configuration process, the beacons scan for Stickers in their vicinity. By default beacons are scanning for stickers every 3 minutes. To get the current location of Stickers, just send a request to the Estimote Cloud API — this triggers a scan and data collection over mesh. You can use a Swift helper method in Estimote iOS SDK:

func generateReport()
{
    let meshManager: ESTMeshManager = ESTMeshManager()
    meshManager.prepareNearablesScanReportCommand(forNetworkIdentifier: meshIdentifier, completion: { (error) in

        if let error = error {
            print("Generate nearable scan report failed with error: \(error)")
            return
        }

        print("Generate nearable scan report success!")
    })
}

The data is then read from any of the beacons by either an iOS or Android device. This operation can be performed manually

func readReportFromDevice(device: ESTDeviceLocationBeacon) {

        // Connection is required to read Asset Tracking report
        if device.connectionStatus != ESTConnectionStatus.connected { return }

        device.scanReports?.readScanReport(completion: { (report: ESTMeshNearablesScanReportVO, error: Error) in

            guard let error = error else {
                return
            }

            // You should use first 4 bytes of Nearable identifier
            // Returned string contains first 4 bytes of beacon identifiers
            let closestDeviceIdentifier: String = report.closestDeviceIdentifier(forNearableIdentifier: "aabbccdd")
        })
}

or with the help of a Mesh Gateway. With several dozen beacons in the space, you’ll get the results in a matter of minutes with the Estimote Cloud API. Ask yourself: how long would it take you to walk around a warehouse and check every nook and cranny for that one particular box you’re looking for? For 25 beacons, it’s well under 10 minutes.

class ViewController: UIViewController {

    let meshGateway: ESTMeshGateway = ESTMeshGateway()

    override func viewDidLoad() {
        super.viewDidLoad()

        self.meshGateway.start()
    }
}

Instead of creating a dedicated hardware gateway, we’re introducing gateway functionality in our SDK. Any phone with the right software can now work as a gateway. To make things sweeter, every beacon collects data from the entire mesh, so even a single phone, at any point in the range of the mesh, is enough to get the full picture. Isn’t that better than buying, say, 400 additional devices you need to configure and maintain?

The cherry on top? To get this setup, you don’t even have to map out the space yourself. Thanks to Location Beacons with UWB, Estimote does the mapping for you. Just follow our setup wizard and place the beacons around the location, then watch the map get drawn with inch-perfect precision.

Try it now!

We’re really excited to get this technology into your hands. If you want to know more just drop us a line at contact@estimote.com.

Rafał Ociepa, Content Manager at Estimote

Marcin Klimek, Product Manager at Estimote

Best practices for submitting your beacon‑enabled iOS 11 apps to App Store

$
0
0

This is it! After weeks of work, you’re ready to submit your beacon-enabled app to the App Store. We’ve compiled a short checklist to clear before you do so, ensuring a smooth approval.

Location Services & privacy

Estimote SDKs allow your app to know the location of the user— be it proximity to places, objects, screens, or precise indoor coordinates. Most of us are pretty sensitive to sharing our location with apps, and so users needs to opt-in to it, and understand how you’re planning to use this data.

Authorization levels

In iOS 11, the user always gets to choose whether to grant access to their location only when the app is in use, or at all times. This means you are required to include the following keys in the Info.plist file:

  • NSLocationWhenInUseUsageDescription

    • explain how your app uses the location while in use
  • NSLocationAlwaysAndWhenInUseUsageDescription

    • explain how your app uses the location while in use, and what additional features are unlocked by the “always” authorization

If your app supports iOS 10, also include NSLocationAlwaysUsageDescription for compatibility.

Make sure to test your app with all the authorization levels, including no authorization. This is true especially if you’re upgrading from iOS 10 and your app previously required the “Always” access— make sure the app still works properly on iOS 11 if the user opts in to the “When in use” option.

Privacy Policy

Apple recommends having a Privacy Policy for apps that collect user-related data … such as location. You can add a URL to your Privacy Policy on the app’s iTunes Connect “App Information” page.

Add Bluetooth usage description

Since iOS 10, apps are also required to include NSBluetoothPeripheralUsageDescription in the Info.plist file, explaining how they use Bluetooth. This requirement is triggered whenever an app links to the Core Bluetooth framework, which is something all Estimote SDKs do.

If you forget this key, your binary will be automatically rejected during the processing stage, after you upload it to iTunes Connect. If this happens, just add the missing key, build a new binary, and upload it instead.

Enable only the Background Modes you need

iOS apps generally don’t get to run in the background—they’re suspended as soon as the user leaves the app. Background Modes are special privileges which change that. For example, music apps can use the “Audio” Background Mode to continue playing music even when the user leaves the app.

Because of these special privileges they give, Background Modes are heavily regulated and scrutinized by the App Store team. For this reason, make sure your app doesn’t enable any Background Modes which you don’t need and use.

Specifically, all of the Estimote APIs require at most the “Uses Bluetooth LE accessories” Background Mode, and nothing else.

It’s also helpful to leave a note for the reviewers explaining why and how your app uses the Background Modes.

Provide a video of the beacon-powered experience

The App Store review team will most likely want to see your beacon-powered experiences in action. Naturally, it might be difficult for them to replicate your beacon deployment … which is why we recommend putting a note about that, and providing a video where you show the location-specific experiences.

This is a tip straight from the App Store review guidelines:

If we’re not able to access part of your app because it’s geo-locked or otherwise restricted, provide a link to a video of the functionality

Use the latest Estimote SDKs available

We’re constantly updating our SDKs with new features and bug fixes, but something less obvious is we’re also adapting to changes in iOS APIs and behaviors … and even to changes in App Store review policies.

Using an outdated SDK might mean unexpected things happening on newer versions of iOS, or getting your app rejected because the older SDKs don’t conform to the new guidelines and policies.

This is why we recommend keeping the Estimote SDKs in your app up-to-date. With dependency managers like CocoaPods, updating the SDK takes almost no time at all.

If for some reason updating to the latest version is not an option, make sure to use at least Estimote SDK 4.25.3, Estimote Indoor SDK 3.0.0-alpha.2, and Estimote Mirror SDK 0.1.6. The previous versions are known to not conform to the latest App Store review guidelines, because of the way we used to build them into binaries.

Contact us for assistance

Every app is different, so if you’re running into an atypical problem getting your app approved, let us know about it. We know first-hand that being stuck in review for days is no fun, and we’ll work with you and the App Store review team to help. You can reach us at contact@estimote.com.

Try our improved Proximity experience in 5 minutes with the new demo

$
0
0

A couple weeks ago, we enhanced the proximity technology through enabling Estimote Monitoring by default. It allows for more reliable proximity areas detection, lets you get started with no pre-configuration and use software to dynamically manage and group beacons.

Today, we’re introducing a brand new in-app Proximity demo that’s easy to set up, and showcase to others. You don’t need to spend hours on development to pitch your idea or share the use case with the team!

The demo walks you through all the crucial concepts of proximity-based apps. You can mark the places and objects around you with beacons, and run a simple proximity demo both in the background and in the foreground, giving you a solid sense of the real proximity experience in just a few taps.

Shake, connect, deploy!

First, the demo guides you through the proximity setup: you’ll see just how easy it is. Pick up a beacon and shake it so the app can detect it, then tell us where you want to place it, and put it there. Thanks to Estimote Monitoring, there’s no need to configure the UUID/Major/Minor or broadcasting power. After the demo, the positions you assigned to the beacons are saved in the Estimote Cloud as the beacons’ tags, so that you can use them in your own app, too.

Demo time

So now that your beacons are all good to go, the demo can start! We’ll detect your proximity to the beacons and since you’ve given each beacon a tag with its position, the app will know where you are and what your context is: “desk,” “conference room,” “kitchen,” etc.

All you need to do is walk from one beacon to another, and see how the content adjusts based on your proximity. Estimote Monitoring will take care of reliably triggering enter and exit events!

Proximity is not the only trigger for the events, the previous context matters, too. Let’s say a user has visited the place before and is coming back, you don’t show them the same content again, do you? Estimote Analytics provide you with all the information you need to avoid that: the number of unique and repeating visits, time spent in specific areas.

It’s your turn now

Here you are, done with the demo, ready to build your own app. We help you create the Estimote account and save the whole demo setup there so you can start building your app on top of it. Instead of starting from scratch, you can continue by developing from a template, or obtaining the token and follow the tutorial on the Developer Portal.

Now, grab your dev kit and experience the new Proximity demo on the Estimote iOS app (the Android version is coming soon). Estimote Proximity Beacons are shipped with Estimote Monitoring enabled by default, you are good to go once you open a dev kit.

Buy Proximity Beacons

If you already have beacons, here’s how to enable Estimote Monitoring. We are thrilled to hear how you like the new demo, ping us at contact@estimote.com to ask any questions and share your experience.


Join thousands of fellow developers and get the latest Estimote news straight to your inbox! Subscribe to our newsletter here

Real time Analytics API - why wait for insight?

$
0
0

At Estimote, we firmly believe in making data-informed decisions. We want to enable our customers to do the same. That is why we initially introduced the Estimote Analytics API— a set of tools for developers to measure user interactions in the proximity of beacons. Then, listening to developer feedback, we expanded the analytics platform. With the introduction of Estimote Analytics 2.0 we enabled our customers to explore metrics like visits, visitors, visit duration, and loyalty via the Estimote Cloud UI. Exposing the API allowed our customers to integrate this service with their own backend, to create a unique solution.

These were the first steps that took us from collecting simple interactions to analyzing millions of data points at a time, and presenting them to our users in real time.

Estimote is exposing Real Time Analytics API

Today, we take the next step to make Estimote Analytics powerful enough to answer the most demanding questions, in real-time. We are exposing Real Time Analytics API. We know that in some cases, a couple of minutes’ delay is still too long. Introducing this feature gives our customers the power to monitor the current status of their businesses. Think of it as an ongoing, constant stream of data that you can follow and respond to without the need to query our servers in any way. It’s the perfect solution for situations where you need to quickly (and we do mean “quickly”—in a matter of seconds) react to emerging trends, rather than wait minutes to get fully-processed data.

What does this mean in practice? Imagine that you are running a furniture store, and you notice that suddenly, several customers have gathered in the kitchen exposition section. With real time data Analytics, you can immediately decide to send more staffers over there to help your customers pick out the perfect countertop or sink. It’s a great way to easily improve user experiences based on real time events.

Estimote Private Cloud

Or think of it this way. In a warehouse setting, you have a machine malfunctioning in the roll-up door section of a factory floor. You can immediately tell who is the closest technician properly trained to patch a quick fix. In a hospital setting, you have a bottleneck of patients in admitting, waiting to have their information taken. You can quickly and efficiently assess which of your nurses can be sent to handle the influx, without pulling anyone critical from the emergency room. The possibilities are endless!

Integration with your services

Another advantage of real time data is the ability to integrate it with your Machine Learning or AI models. This lets you create prediction mechanisms which mean you’ll be better prepared for next week’s surge of in the hospital—or those other situations!

Grow faster than the demand

Today, Estimote Analytics is an integral part of beacon deployments made by some of the largest Fortune 500 companies and our growing developer community. Every day we receive, process, and store millions of events to give our customers insights into the status of their deployments. To meet these growing requirements we have adjusted our internal service to handle new spikes of traffic. This change is completely transparent to you, our customer. If you’re already using the Analytics service, there’s nothing you need to do to upgrade. The only difference is that now, you’re going to see data in the Cloud UI and API much faster; to be more specific, we’ve decreased the processing delay three times.

Gathering data on the backend would be much less meaningful without devices “on the ground.” Following this logic, we want to make sure you can easily collect the data in your apps. To make things even more seamless, the latest Mobile SDKs have Analytics on by default. It’s one more in a series of updates, where we are focused on making it easier than ever to hit the ground running with your beacon deployment. Furthermore, we are adding full support for Estimote Monitoring in Analytics. The Estimote Monitoring packet, which is turned on by default on newly purchased beacons, allows you to accurately see how many visits and visitors were in the range of your devices. This change gives you yet more tools to measure the impact and see the status of your beacon deployment.

Try it now!

Real-time Analytics is also coming to our mobile apps. You’ll be able to test, demo, and pitch this technology to your clients even more easily than before.

As always, we’re eager to hear your feedback and to help get you going! Let us know what you think on Twitter or drop us an email at contact@estimote.com

NASA’s Johnson Space Center transcends space and time with custom built bike tracking system

$
0
0

NASA’s Johnson Space Center campus is always bustling with people. With about 3,000 employees, 12,000 contractors, and a steady stream of interns and students making their way around the facilities at any given moment, efficient modes of transportation are a must … rockets and space shuttles aren’t exactly pragmatic! Enter their bicycle sharing program, tracked and powered by Estimote beacons.

enter image description here

It all started with a summer internship by an ambitious Computer Science student from Washington University in Saint Louis named David Lie-Tjauw. David was working alongside the sustainability team at NASA to identify issues and prototype unique solutions. With the mentorship of NASA leadership, David was able to flex his technical knowledge while gaining precious insights and education to building a fully workable product. After numerous brainstorming sessions, they honed in on Johnson Space Center’s free-range bike program. These over 300 bikes are available for NASA personnel to freely use. The problem? People had trouble actually finding them on campus! Thus, the project was born: what if employees could simply log in, and view the real-time locations of the bikes?

Here’s how it works. Each free-range bike is outfitted with an Estimote Proximity beacon, broadcasting the identifier of the respective bike. Stationed in every building at JSC is a Raspberry Pi, substituted for a smartphone, hard-coded with a permanent location tag and running a custom-built Android application that scans for nearby beacons. When a bike is parked at a building, the Raspberry Pi and Android app sees the beacon identifier, sending it to the online real-time database (in this case, they’re using Google Firebase). For example, a Raspberry Pi in Teague Auditorium would tell Firebase that bikes #12345, #54321, and #19283 are at Teague. The Raspberry Pi updates the database roughly every 30 seconds, so once a bike leaves a building, the Firebase database will reflect changes with each update. Finally, an easy-to-use website called BikeJSC reads the bike data from Firebase and visualizes it on a Google Map image of Johnson Space Center. As bikes move throughout campus, the website will update in real-time to accurately display the number of available bikes at specific buildings. NASA employees can use this website to find nearby bikes.

enter image description here

Most of our developers use smartphones, but it was clear off the bat that smartphones wouldn’t scale for this project… the campus is huge! Needing a smartphone for every building would be expensive and battery life would be killer, so David utilized Raspberry Pi’s, mini barebones computers with no screens to work alongside Estimote SDK. In order to successfully run Android applications on the Raspberry Pi, David used Android Things, a brand of Android OS specifically tailored for the Internet Of Things.

“Bike tracking at NASA JSC would not be possible without the use of the Estimote SDK. I would like to give a shout out to Estimote’s amazing engineers and developer community who have created extremely useful and comprehensive documentation for the Estimote SDK. Often times, the biggest barrier that keeps users from implementing any new technology is the availability of help and resources needed to figure out how to use such technology in the first place. Estimote has done a fantastic job on this end!” -David Lie-Tjauw, lead project developer

Often you hear in business that a foot in the door is everything. Well, what good is a foot in the door at NASA? We can’t help but humblebrag about influencing a NASA intern, ourselves. Plus, we’re hearing all sorts of ideas! David is a self admitted Estimote enthusiast. He’s already brainstorming new ways to integrate BLE tech and Estimote beacons in space exploration. For example, what if the bike tracking system could be applied by using Estimote beacons to track the location of objects in microgravity, aboard the International Space Station? The concept of contextual computing and its potential to revolutionize hardware and software mechanics can enable engineers at NASA to attack problems from entirely new perspectives.

Be sure to keep an eye on this young talent, and look out for the bikes next time you’re visiting NASA’s Johnson Space Center in Houston!

For more information on the project, feel free to reach out to David Lie-Tjauw

Written by Jess Anderson, Content Creator + Community Manager @ Estimote


The most reliable Proximity SDK is now available for Raspberry Pi using Android Things

$
0
0

Recently, we announced our Proximity SDK, which offers both a reliable beacon-based proximity experience and an easy to use API. Proximity SDK can be used for both iOS and Android devices, however for some very interesting use cases this is not enough. We’ve found out that you want to build interesting real world software applications using low cost computers, just like Raspberry Pi. In this great example of Internet of Things communication, central nodes (e.g. Raspberry Pi) gather data from low power nodes (beacons) about their Proximity (and build simple object detection mechanisms — a basic asset tracking solution) or Telemetry information (using beacons’ built-in sensors). You used to build those use-cases using generic BLE scanning libraries. With the introduction and increasing popularity of AT, this changes. We’re happy to announce that our latest and most robust Proximity SDK is now officially supported on embedded platforms.

Yes - this means that you can now efficiently scan for Estimote Beacons on Raspberry Pi 3.0, or NXP i.MX7D.

Why is this new solution better?

First of all, you get the most reliable Proximity SDK with a great API. We are currently fully supporting this SDK as a part of the general Proximity Android SDK — you can expect all reliability improvements and new features of our stack to be fully covered on Raspberry Pi. Proximity SDK makes it simple to build beacon-based proximity experiences, and helps you get started really fast.

Secondly, you no longer need embedded development skills to create new beacon-based apps for the IoT. You can use standard Android developments tools, programming languages (Kotlin, Java) and toolchain (Android Studio) to write new apps and install them on your development board.

How does it work?

The core of this solution is Android Things. Android Things is an operating system for embedded development platforms. The most popular among several development boards certified for Android Things is Raspberry Pi 3 — a low-cost, small, single-board computer equipped with a Bluetooth Low Energy chip. Using the Estimote Proximity SDK API for Android (Things) you are able to create an application in Android Studio. Your application is scanning for beacons using signals transmitted from them either to detect proximity or read sensor data. You can later use that extracted real world information to build a complete Internet of Things project.

What do you need to do?

To use it, all you need to do is install Android Things on your development board and run our Proximity SDK Android Things sample app on it. To help you get started really fast we have prepared a detailed tutorial (some really handy shortcuts included :)).

Share your thoughts on our forums or drop us an email

Estimote Cloud Attachments API: store context in the cloud, less in your app!

$
0
0

In 2016, we introduced the Beacon Storage API allowing developers the opportunity to store small amounts of data within the built-in memory of each Estimote Location Beacon. This feature lets you share data with nearby customers, and display text or images coming directly from the beacon. It’s a perfect solution where internet connectivity is spotty and you don’t need to store a lot of data. An alternative is to have your app either include that data, or fetch it remotely from the cloud. That means either hard-coding the info in the app—which doesn’t scale—or relying on an external service to store it. We’re constantly looking to improve the experience for our developers, shorten the development time, and make maintaining apps a breeze. Today we’re helping with that: introducing our Estimote Cloud Attachments API.

If you haven’t used external cloud services (e.g. Firebase or Deployd) or your own backend before, you can use this API to associate your own data with a beacon, and then use this contextual information to enhance the experience for your users. Embedding Cloud Attachments API service could also decrease the complexity of your application — fewer dependencies are always better. It can also save you time by maintaining smaller number of external services. Another advantage of using Cloud Attachments API is that you don’t need to hardcode data in your app anymore. It helps with maintenance and updates.

Here is a snippet of code showing how to use attachments:

// create an attachment
curl -X POST 'https://cloud.estimote.com/v3/attachments' \
    -u YOUR_APP_ID:YOUR_APP_TOKEN -H "Content-Type: application/json" \
    -d '{"data": {"payload": {"key1": "1","key2": "text"},
                  "identifier": "YOUR_DEVICE_IDENTIFIER"}}'

// fetch an attachment
curl -X GET 'https://cloud.estimote.com/v3/attachments/ATTACHMENT_ID' \
    -u YOUR_SDK_APP_ID:YOUR_SDK_APP_TOKEN -H "Accept: application/json"

If you want to utilize them inside Estimote Proximity SDK take a look at code snippets for iOS and Android

We’re often asked why Estimote hasn’t built our own beacon CMS (Content Management System). The answer is simple: with such a vast landscape of use-cases, we cannot create a service which will be perfectly suited for all our users. Therefore we believe that it’s better to deliver similar services as flexible APIs. This way our customers can use their domain-specific expertise to create their own magical experiences.

If you’d like to create your own specialized beacon CMS, you can use Estimote Proximity SDK and Cloud Attachments API to do so. However, if you’re just prototyping, we’ve also added a new section to the Beacon Settings page in our Cloud where you can find the data currently assigned to a given beacon. There is also a simple editor which helps you to easily add, change, and remove existing information, and best of all, you won’t even need to connect to physical devices to apply the updates.

Estimote Cloud Attachments

You may be wondering how you can use this new feature. Just imagine you are responsible for exhibition content in a museum. Typically, in order to get some detailed information, your visitors would need to come close to the paintings to read the small print on a panel. That’s not necessarily a problem when the venue is empty, but what’s that experience like when the place is crowded? Not great! To make it better, you can place a beacon by the painting, then your team can create a mobile app and use the Estimote Attachments Cloud API. When your visitors are close to the art piece, their smartphones will know which paintings are nearby (thanks to Estimote Proximity SDK), and the app will fetch the data associated with this beacon to show them context-based information. Of course, that could be a more detailed description of the painting, but it could also include a thumbnail, or even a link to a video depicting an x-ray of the multiple layers built up.

Estimote Attachments Cloud API is available today to all our users! You only need to log in to Estimote Cloud or if you prefer to use our API, just check out our documentation. Happy hacking!

Build your first proximity app in 5 minutes

$
0
0

We’ve recently launched our Proximity SDK enabling the world’s most reliable beacon notifications and proximity zone monitoring. Getting to know a new SDK and learning its API can be time-consuming. It often means hours spent on manual integration and troubleshooting. Now there’s a better way. You can save that time and focus on your use case, if you let us guide you through our new App Templates, which come with our Proximity SDK integrated from the start. We’ll pick the right template and go through what’s possible—defining proximity zones, adjusting range and more. Now, buckle up and let’s go!

App Templates and a Proximity Beacon devkit

Starting off with the right template

The most popular use cases for proximity are either about adjusting the content of an app depending on where the user is, or sending notifications when someone enters or leaves an area. You can easily accomplish both with our App Templates available in the Estimote Cloud.

Downloading the Notification template

In the first case, users actively interact with the app and you adjust content based on where they are. Think about a museum application that presents different content to a visitor depending on which artwork they are closest to (similar to the Guggenheim Museum’s case). Here you would go for “Proximity for a Single Beacon” and “Proximity for Multiple Beacons” templates as they monitor proximity zones in foreground.

It’s different when your app is supposed to stay idle until a specific event occurs—a user entering or leaving an area. In this case, monitoring runs in the background—without the app being active. The moment you want to engage your users, you can quickly bring the app into focus with a notification. It could be used for proximity marketing in retail, like in the Tesco Lotus’ case. They send different discounts and coupons based on the department you enter. Here, the “Notification” template would do as it works in background.

Got a completely different idea and want to start from scratch? Go for the “Blank” template with the Proximity SDK already integrated.

All those templates are available for both iOS & Android and now support Kotlin! Now let’s see how you can tweak them to your use case.

Defining proximity zones with attachments

After choosing the right template, it’s time to connect to your beacons, adjust their range… Well, that’s not the case anymore! Proximity zones are software-defined!

Each beacon has a Cloud attachment associated with it. This means you can keep simple data (for example names of the areas) in the Estimote Cloud using key-value pairs. They live there and can be modified at any time directly from the Estimote Cloud dashboard in the Beacon Settings section:

Beacon attachments in the Estimote Cloud

Then, zones are defined based on those attachments in the mobile app using EPXProximityZone objects. You can easily adjust their range with the desiredMeanTriggerDistance argument:

let zone = EPXProximityZone(
  range: EPXProximityRange.custom(desiredMeanTriggerDistance: 3.0)!, 
  attachmentKey: "room", 
  attachmentValue: "kitchen"
)

Taking it further with zone based interaction

You can decide what happens when a user enters or exits an area defined by a proximity zone:

zone.onEnter = { attachments in
  // Send a notification saying “Hey, looking for coffee?”
}

zone.onExit = { attachments in
  // Send a notification saying “Have a nice day and see you soon!”
}

It’s possible to subscribe to both of the events at once. You could use that for gathering analytics to better understand how your users interact with the space:

// Both enter and exit events
zone.onChangeAction = { attachments in
  // Send analytics to your cloud
}

So when entering the kitchen, a user would get this:

Screenshot showing a notification

Grab a devkit and build your app!

Now that you know all about templates, go to Estimote Cloud and start building your first app with the Proximity SDK. Keep in mind, it runs on Estimote Monitoring 2.0 and Proximity Beacons have this enabled by default. However, if you bought a dev kit before September 2017, just enable Estimote Monitoring and you are good to go!

Devkit of Proximity Beacons

Buy Proximity Beacons

If you need more help, clarification, or just want to brag about an amazing app you’ve built, head straight to our forums or ping us at contact@estimote.com.

How we hacked our conference rooms to get more feedback [Case Study]

$
0
0

Beacons are often used in workplaces to make working more efficient or enjoyable. It’s no different here at Estimote - we love tackling various issues with our own tech.

We spend plenty of time in conference rooms, planning new features and iterating on existing ones. The habit of giving constant feedback is strongly embedded in our company culture. We do our best to give each other feedback on how we run meetings to make them more efficient and action-oriented. Often, though, there’s no time for that: once the meeting is finished, everyone disperses and moves on to the next task. Our leaders are then left hanging, wondering, “Did it go well? Could I have made it more concise? Was the agenda appropriate?”

A few weeks ago during an internal hackathon, we built an Android app to address this problem. We integrated it with the latest Estimote Proximity API and Google Calendar’s API. Stay with us as we share a quick step-by-step guide below (code snippets included)!

Estimote conference rooms

How does the app work?

Our app asks you for feedback right as you are leaving the conference room. (Timing is key, right?). It sends a notification and takes you to a simple rating page. With a star rating system you can evaluate various aspects of the meeting and can also leave a note for the organizer! The app then prompts you to send the feedback to the facilitator’s inbox. For this use case, we placed one Proximity Beacon in every conference room and integrated with G Suites. (Everyone here, including our conference room, has its own calendar).

Note: We considered the fact that one can just fetch data from the calendar and push notifications the moment a meeting is scheduled to end. But, what if a meeting ends five minutes earlier than anticipated? You would get the notification when you’re already on to the next task and probably discard it for later. And if a meeting is running late, it’s even worse! There is nothing more distracting than everyone getting simultaneous notifications just as you’re wrapping up. To know exactly when you exit the room, we use Proximity Beacons that trigger a notification precisely when you leave the defined area.

Okay, back to the actual case study!

1. Ask for the necessary permissions

For this particular case, you need:

  • access to user’s calendar*
  • access to Bluetooth so that the app is able to interact with beacons

You can find a tutorial on asking for permissions available here.

*For the purpose of building this use case, we assume that everyone has some calendar app, and also that their work calendar is synced.

2. Get the list of calendars

To get the events, you need to get the right calendar first. Android doesn’t make it easy to figure out which calendar you should be fetching. So, the first thing we did was get the list of all phone calendars thanks to Google’s Calendar Provider. We logged the calendar id, display name, account name and owner. Remember to replace name@example.com etc with your desired data.


private val PROJECTION_ID_INDEX = 0 private val PROJECTION_ACCOUNT_NAME_INDEX = 1 private val PROJECTION_DISPLAY_NAME_INDEX = 2 private val PROJECTION_OWNER_ACCOUNT_INDEX = 3 var cur: Cursor? = null val cr = contentResolver val uri = Calendars.CONTENT_URI val selection = ("((" + Calendars.ACCOUNT_NAME + " = ?) AND (" + Calendars.ACCOUNT_TYPE + " = ?) AND (" + CalendarContract.Calendars.OWNER_ACCOUNT + " = ?))") val selectionArgs = arrayOf("name@example.com", "com.example","name@example.com") cur = cr.query(uri, EVENT_PROJECTION, selection, selectionArgs, null) cur?.let { while (cur.moveToNext()) { val calID = cur.getLong(PROJECTION_ID_INDEX) val displayName = cur.getString(PROJECTION_DISPLAY_NAME_INDEX) val accountName = cur.getString(PROJECTION_ACCOUNT_NAME_INDEX) val ownerName: String = cur.getString(PROJECTION_OWNER_ACCOUNT_INDEX) Log.i("Calendar", "ID: $calID DisplayName: $displayName AccountName: $accountName OwnerName: $ownerName") } }

3. Find the right calendar and fetch the events

From the list of calendars, we find the one matching the email address of the user and grab its ID. We use this ID (in our case it’s ‘3’) to fetch the list of upcoming events for a given user. It’s up to you how far ahead you look - in our case, we take the events for the next 14 days. That way, the app doesn’t need to to fetch events over and over again. Lastly, we log all events with its title, start date, end date and organizer.


val calID = 3 val now = Date().time ContentUris.appendId(builder, now - DateUtils.DAY_IN_MILLIS * 1) ContentUris.appendId(builder, now + DateUtils.DAY_IN_MILLIS * 14) val eventCursor = contentResolver.query(builder.build(), arrayOf("title", "begin", "end", "allDay", CalendarContract.Events.ORGANIZER), "Calendar_id=" + calID, null, "endDay ASC, startMinute ASC") if (eventCursor.count > 0) { while (eventCursor.moveToNext()) { val title = eventCursor.getString(0) val begin = Date(eventCursor.getLong(1)) val end = Date(eventCursor.getLong(2)) val allDay = !eventCursor.getString(3).equals("0") val organizer = eventCursor.getString(4) Log.i("Event:", "Title: $title Begin: $begin End: $end All Day: $allDay Organizer: $organizer") } }

4. Add the beacon scanner to the app & scan

We want to know when exactly a person leaves the room. To get the most accurate results, we use Estimote Proximity SDK. We place a Proximity Beacon in every conference room and start scanning for them.

val cloudCredentials = EstimoteCloudCredentials(YOUR_APP_ID_HERE, YOUR_APP_TOKEN_HERE)
val proximityObserver = ProximityObserverBuilder(applicationContext, cloudCredentials)
       .withBalancedPowerMode()
       .withOnErrorAction { }
       .build()

val venueZone = proximityObserver.zoneBuilder()
       .forAttachmentKeyAndValue("room", "mint")
       .inNearRange()
       .withOnEnterAction { }
       .withOnExitAction { showNotification() }
       .create()

val observationHandler = proximityObserver
       .addProximityZone(venueZone)
       .start()

Beacon on a table

5. Trigger a notification

To push a notification to a user, several conditions have to be met:

• a user has a meeting that has just finished or is ending soon

We don’t want to send users notifications about events that finished several hours ago or will start next week, obviously. So, in our code, we only look for events that end 20 minutes before and after the current time. To give you an example, if it’s 3:25 PM, our app will only check if a calendar event ends between 3:05 PM and 3:45 PM and will ignore any others.

• a user enters the beacon’s range at least 15 minutes before and hasn’t left since

This condition eliminates all the passers-by who accidentally entered into the beacons range. We assume that if someone stays in the beacon’s range for 15 minutes or more, they’re attending a meeting.

• there is an exit event

Most use cases of beacons work based on enter/exit events. You define the proximity zones of e.g. 5 meters and then you program specific actions to be performed when a user enters the range (enter event) or leaves it (exit event). In our case, we’re checking if anyone is leaving the range of our beacon placed in a conference room.

If all the conditions above are met and a user receives an exit event, that’s a clear sign this person has just left the meeting.

6. Display a notification

We use Android Native Method and display the feeback screen:

Conference room app's screen

7. Redirect to an email client

When the “send feedback” button is hit, we redirect a user to his/her default email client with a predetermined email.


sendButton.setOnClickListener({ val intent = Intent(Intent.ACTION_SENDTO) intent.type = "message/rfc822" intent.putExtra(Intent.EXTRA_EMAIL, "name@example.com") intent.data = Uri.parse("mailto:name@example.com") intent.putExtra(Intent.EXTRA_SUBJECT, "Your meeting has a new rating") if (!TextUtils.isEmpty(commentEditText.text)) { intent.putExtra(Intent.EXTRA_TEXT, "Overall score: " + overallRateBar.rating + "\nPunctuality: " + punctualityRateBar.rating + "\nAgenda: " + AgendaRateBar.rating + "\n Comment: " + commentEditText.text) } else { intent.putExtra(Intent.EXTRA_TEXT, "Overall score: " + overallRateBar.rating + "\nPunctuality: " + punctualityRateBar.rating + "\nAgenda: " + AgendaRateBar.rating) } startActivity(Intent.createChooser(intent, "Send mail...")) })

Because of the limitations of our hackday, we didn’t get to add the option of anonymizing the message user sends. But you can do it easily! If we had a few more hours, we would have also built a web dashboard that would be capable of gathering all this data and calculating average scores over time. It’s definitely a priority for next time!

8. Send a user back to the app and display the “thank you” message.

val intent = Intent(this, ThankYouActivity::class.java)
startActivity(intent)

Following these steps, we were able to build a working prototype of our app in one day! And it worked pretty well, even in our crazy office environment with thousands of beacons.

Some further inspiration

We know there are things we could improve in this app to make it even more reliable. Here are some ideas:

  • Our app doesn’t actually check which room you’re in. We only determine if you’re in a conference room or not. This could be easily changed with Cloud Attachments API. Your app could easily return the information about which particular room a user is in. It could also verify it against the room’s calendar to make sure you don’t get notifications for events you’re not involved in.

  • Our app sends feedback requests to the event organizer and there’s no point in them rating their own meetings, right? It’s a fairly simple fix! Just add one extra condition to the code and ignore the exit events if the person in question was an organizer.

  • To make the task easier, we had to assume that users have their @estimote.com account synced on their phones, otherwise we wouldn’t be able to fetch their events. It would be much more efficient to fetch the calendars of the conference rooms and compare the list of participants with the devices in range of particular beacons.

There are tons of use cases for conference rooms that should be fairly easy to build with a bit more time. Here are some of our ideas:

  • send a Slack notification to the organizer if there’s another meeting starting in X minutes

  • check if a room is occupied on a web dashboard or in an app

  • display, in an app, the meetings on deck for the room you’re in (in case you decide to have some focus time in a room without a reservation)

  • automatically ping people on Slack if they are late for a meeting (they’re not in the range of the respective beacon)

  • check where everyone is at a given time. Use our Indoor Location or Proximity SDK.

There are probably many, many more! Have you built something similar that you would like to share with the world? Or maybe you would like to build a similar use case and don’t know how? Let us know!

Crafted by Piotr Małek, Community Manager and Martyna Leniart, Android Developer.

Presence verification and security is more refined than ever with Estimote Secure Monitoring

$
0
0

In the early days of beacons, the software was written on top native scanning solutions built into iOS and Android. One of the first questions developers would ask about them were: is this secure? How do we make sure the user actually is next to the beacon? How do we make a deployment bulletproof? We designed our own tools that have been tested in the field by our largest customers. But we’ve come a long way since then. Now the backbone of our software consists of custom proximity technologies like Estimote Monitoring and the Proximity SDK. Our Proximity SDK’s hyper reliability, unlimited zones, and software defined range make it our core offering! And with this more sophisticated product comes the need for more sophisticated security and presence verification. That’s why today, we’re pleased to release Estimote Secure Monitoring.

enter image description here

So, how does it work?

Imagine you’ve built a beacon-based payment system for your train or bus, where you can automatically charge riders that are in the cab. Without security, it’s possible for somebody clever to spoof a train beacon, put it in our own Estimote lobby, and rack up fare charges every time you enter the Estimote office. Or think of it this way: automatic doors that open for you when you’re near and have a valid pass in the app. Without security, some could spoof a beacon and make the app believe you’re near the gate when you’re not, and the gate would open for a random stranger.

You need to protect the system against being gamed! You don’t want anyone to be able to clone your beacons with a Bluetooth sniffer, and then cost your business money without ever leaving their couch. This is where Estimote Secure Monitoring (ESM) comes in.

enter image description here

An Estimote Beacon with ESM broadcasts an encrypted sequence of bytes along with a value called the Shared Secret. Shared Secret is assigned to your beacon in Estimote Cloud and the Proximity SDK uses Estimote Cloud to resolve the encrypted broadcast. Additionally, the sequence of bytes is shuffled in constant intervals, around 10 minutes by default. We call that “packet rotation.” All of this means that only your app is able to decode what the beacon broadcasts and that the user needs to be physically present near the beacon. Even if they managed to clone it, the clone would become useless in a matter of mere minutes.

enter image description here

To enable Estimote Secure Monitoring, just follow the instructions here.

If you have any doubts or questions about ESM, share them on our forums, or feel free to drop us an email!

Proximity reinvented - launching the next-gen Proximity beacons

$
0
0

We are thrilled to announce our launch of the next generation in our core product - the world’s best Proximity beacons. They are the final element to our proximity stack which we have continued to innovate and completely reinvent over the last two years.

OS for the physical world

At Estimote, we create an Operating System for the physical world. A software environment where developers can programmatically access the location of people and objects. Then, they can use this data to build next-generation contextual apps for smart spaces such as offices, transport centers, and hospitals.

The key for every OS is reliable user input and a consistent user experience. For computer software, it was the keyboard and mouse position; for phones, it was multi-touch. For real-world software, it’s precise user location.

We spent the last 2 years perfecting just that - reliable enter/exits for a single region represented by a Bluetooth beacon.

When Apple announced Core Location API with its iBeacon implementation, and Google followed up with Nearby API, both were designed for a generic Bluetooth device acting as a beacon.

At Estimote, we took the full-stack approach. We designed our own beacon hardware/firmware as well as the Proximity SDK iOS/Androidto be optimized specifically for reliable enter/exit events. We also integrated it with Cloud APIs to make it easy to scale and secure beacon deployments.

New Proximity Beacons

We launched our original Proximity beacons four years ago. We were the first ever company to ship iBeacon-compatible devices. We didn’t expect them to become the world’s most popular beacons for developers, and power the largest commercial deployments around!

Today, we are announcing the new generation of Proximity Beacons. They come with many hardware and software innovations, and are available to buy right away.

Buy 4 Proximity Beacons for $99
We ship daily to any place in the world

Read below the long list of all the hardware and software improvements.

Long-lasting batteries
The new Proximity beacon have twice as much battery capacity. We switched to two AA batteries that last 3 years on default settings, or 2 years for a 100ms iBeacon packet. When configured to advertise every 2000ms, they can last more than 7 years.

Bluetooth 5 chip
The new Bluetooth 5 spec is not fully adopted across mobile devices yet, but our beacons are ready for the update. The SoC we use is Bluetooth 5 compliant and can be upgraded over-the-air as soon as major phone manufacturers implement it as part of their Bluetooth stack.

Planet-friendly enclosure
New Proximity beacons have the same durable silicone enclosure made from silica (sand), which is non-toxic and 100% recyclable. It’s great for indoor and outdoor use, able to survive temperatures from -30°C to +55°C and is water-resistant (equivalent to IP67).

Improved adhesive
Each beacon has nanotechnology smart tape that can be repositioned for the first 40 minutes and will stick forever after that. For unusual surfaces such as an old brick wall or wood, there is a small mounting hole on the back. Simply use a screw or nail on the wall, and the beacon enclosure will fit over it perfectly.

Other hardware upgrades in the new Proximity Beacons

  • New 3-axis accelerometer supporting flip-to-sleep mode during prototyping
  • Light Sensor detecting Bright/Dark environment
  • Temperature sensing capability
  • RGB-color LED for configuration feedback and AR VLC
  • New PCB IFA antenna tuned for S-Band for performance

Each beacon is a little computer with a 32-bit chip. It runs embedded software called firmware. New beacons have the latest version supporting a bunch of new features - you can read more below.

Reliable Proximity packets
All the beacons we manufacture are configured by default to use a set of our own Bluetooth advertising packets. These custom packets (Estimote Monitoring schema), alongside Proximity SDK, are optimized for the best enter/exit reliability.

Multiple packets support
Customers who optimise more for interoperability rather than reliability can enable other popular packets such as iBeacon or Eddystone. New Proximity beacons can broadcast all these packets at the same time, if that’s what you want to do. Keep in mind, this will drain a bit more battery.

Secure Estimote Monitoring
To prevent attackers from piggybacking on your beacons and to comply with GDPR regulations, our intelligent firmware rotates and encrypts advertised data. This is patented technology and only provisioned mobile SDKs with Cloud access can decode it.

Cached Estimote Monitoring
For scenarios when users’ phones don’t have a constant Internet connection, it is possible for the mobile app to cache enough data to keep monitoring for beacon interactions while being offline for some time.

Proximity SDK
In the past, we used to have one giant SDK for both proximity and fleet management. We have decided to separate Proximity SDK and have written it from scratch for iOS and Android.

The new SDK is optimized for the best reliability and ease-of-use. It leverages our experience with hundreds of deployments and, thanks to signal filtering, allows you to more accurately detect the users the moment they interact with your beacon. With the software-defined range, you can set when the event is triggered in code instead of relying on connecting to a beacon and tweaking the broadcasting settings.

Fleet Management SDK
We do still innovate with the previous SDK; its main objective now is remote fleet management. Use it for any apps that will authenticate and connect to beacons, change their settings or upgrade the firmware. You can also use this SDK for collecting telemetry data such as battery status.

App Templates
To get started with our SDK, simply log in to our Cloud and go to Apps. Once you select the preferred language (Obj-C/Swift or Java/Kotlin) a ready-made app with our SDK, API token, and beacon identifiers will be downloaded as a ZIP file. Just compile it to have your first proximity app.

Demo Apps
To experience both SDKs in action, download Estimote app from the Apple App Store or Google Play. Try Proximity demo to experience improved reliability. Under the “Configuration” tab with the radar icon, you can still connect and change beacon settings. All of this can be re-created inside your very own app using our SDKs.

Development Mode
All manufactured beacons are automatically assigned to a Cloud account where we store a copy of their configuration. Previously, only the beacon owners (typically the person who purchased them) were allowed to change any settings. New Proximity beacons are shipped in “Development mode” meaning that a team of developers can freely play with them and tweak any settings. However, only the true owner can “transfer their ownership” or secure them for the final deployment.

Cloud Attachments
Historically, beacons broadcasted static identifiers. Many of our customers used different database architectures to map these identifiers into contextual data served to nearby users. In order to simplify app development, we have therefore introduced the new Cloud Attachments API. Each beacon that we store in the cloud can also store a JSON object. The object can be easily accessed via the mobile API that is part of our SDK, so you can keep your tags, location data, descriptions or any other data assigned to beacons there.

To get started order your dev kit today!

Buy 4 Proximity Beacons for $99
We ship daily to any place in the world


You can always shoot us a note to contact@estimote.com if you have any questions or if you are interested in bulk quantities.

Updated Proximity SDK introduces tag monitoring and enables offline use cases

$
0
0

Here at Estimote, we want to help you deliver an outstanding proximity experience — triggering user interactions at the right time and place. Last year, we released a separate Proximity SDK focused solely on detecting those enter and exit events reliably. Since then, we’ve been looking closely at how you use this SDK, and gradually refining it with each silent release.

Today, we are happy to announce that Proximity SDK (iOS& Android) reaches its next milestone — a mature API that’s consistent across both mobile platforms. It brings a new approach to defining proximity zones: using tags instead of UUIDs or device identifiers. It also introduces the all-new “cached mode” to support any case where internet access is limited. Read on to learn more!

Monitoring for tags instead of UUIDs

Since the initial release of Proximity SDK, you’ve built thousands of proximity monitoring apps that make millions of calls to our Tags/Attachments API. We’ve also noticed that those apps solve a wide range of problems like: automated check-ins, conference room booking, event heatmaps, guided tours, and more.

Inspired by your implementations, we’ve added the features you asked for, fixed the issues you reported, and have evolved our API in the process. As a result, we’ve adjusted the way your apps use Proximity SDK to better serve those use cases — introducing tags and attachments.

Defining proximity zones with tags

Now, you can assign a tag such as “lobby,” to your beacon in Estimote Cloud, tell your app to monitor for it, and know whenever your users enter/exit the “lobby”. It’s more intuitive than using abstract identifiers.

Tags are powerful, because you can edit them remotely at any time without reconfiguring beacons or recompiling your app. This streamlines beacon fleet management: if you need to add or remove beacons from your deployment, you just assign the right tags in Estimote Cloud — and the whole setup is instantly updated! Since your app already knows what tag to monitor for, it will trigger proximity events around any of your beacons that have this tag defined.

Moreover, you can assign multiple tags per beacon to specify different groups you want to monitor for at any given time. In short, tags give you the freedom of instant remote setup adjustments, and enable grouping for complex deployments.

Adding more context with attachments

We also made it easier to remotely manage the content triggered by beacons. Until now, storing that content — such as a description of a piece of artwork — required external storage such as Firebase, iCloud, or a custom backend.

Now, you don’t need a backend anymore, because it’s possible to associate up to 50 kilobytes of data with a single beacon using attachments. They can be set up in Estimote Cloud or by using our attachments Cloud API. Then, when you monitor for tags, approach a beacon and a proximity event is triggered in your app — you get the full context of that zone together with all attachments. (Please note attachments are no longer used for monitoring zones.)

Additionally with this release, we’ve put more focus on feature parity and API consistency across mobile platforms. Simply put, the way you use Proximity SDK is similar on both supported platforms. E.g. if you monitor for a proximity zone on Android, replicating it on iOS is a breeze.

Enabling offline use cases with “cached mode”

Are you building an app for a campsite, cruise ship, or subway station? We have good news — Proximity SDK can now function in environments with limited internet connection.

The “cached mode” enables an app to fetch all necessary data from the Cloud when monitoring begins, and store it locally on a device for later use to ensure the proper user experience at all times. This way, we cover places like forests, ships, underground mines, or anywhere else where internet connection is not at its prime.

A quick way to start!

Building a proximity app requires three things: Estimote Proximity SDK, Estimote Cloud, Estimote Beacons, and it can be done in three steps:

For an even quicker start, you can go with one of our app templates — they have Proximity SDK pre-integrated and ready to use. Just go to Apps in Estimote Cloud, pick a Proximity or Notification template, and you’ve got a simple proximity app up and running!

Another way is to take it slow and get the full picture by building your app from scratch. In this case, follow the iOS and Android tutorials on our developer portal.

All you need now is an Estimote Cloud account and a set of Estimote Beacons. We have begun shipping the brand new Proximity Beacons optimized specifically for Proximity SDK.


Buy 4 Proximity Beacons for $99
We ship daily to any place in the world


If you have any questions or just want to brag about an amazing app you’ve built, head straight to our forums or ping us at contact@estimote.com.

Lily Matsuk, Product Manager at Estimote


Announcing LTE Beacon for asset tracking

$
0
0

At Estimote we believe apps of the future won’t be downloaded to phones, computers or tablets. Developers of tomorrow will use the physical world as their canvas. Precise location of people and objects will be accessed programmatically and apps will be “installed” on places.

To make this happen we are working on an Operating System for the physical world: a software environment where developers will be able to quickly build apps for one location and run the same experience on many.

Our first product, Estimote Bluetooth Beacons launched in 2013, enabled us to locate people and their phones inside buildings. To do that, we used Bluetooth Low Energy (BLE), an emerging technology at the time. Our iconic design, easy-to-use software and simple APIs made them the most popular beacons for developers. Since then, more than 150,000 innovators, startups, agencies, and Fortune 500 companies have used them to create context-aware apps. They’ve built mobile solutions to increase workplace productivity, comply with safety regulations, and deliver other magical experiences at scale, something that simply can’t be accomplished without accurate microlocation.

Estimote Bluetooth Beacon and Estimote LTE Beacon

New product from Estimote

Today we are proud to announce another revolutionary IoT device. Once again, we chose to leverage emerging IoT technologies (LTE M1 and NB-IoT) and have designed and productized a new device we call the “Estimote LTE Beacon.”

Estimote LTE Beacon

It’s a small, wireless beacon that can compute both its precise indoor and outdoor position. It can talk directly to the cloud and last multiple years on a battery.

Estimote LTE Beacons are designed primarily to seamlessly locate assets and vehicles when they move between indoor and outdoor environments. Their secure firmware/cloud software is crafted to provide true “proof of location” and “proof of delivery.”

Indoor to outdoor tracking with BLE and LTE-M

Since the device is fully programmable using JavaScript, it can also support other creative use-cases — for example, it can act as a remotely managed iBeacon or a gateway used to configure other Bluetooth beacons.

Smartphone without a screen

The best way to think of this new IoT device is to imagine it as a small smartphone, but without a screen. It can last years between charges and the cost is similar to a beacon. It has cellular LTE connectivity, built-in GPS, and Bluetooth radio. And it is also possible to create and download apps that run on the LTE beacon.

Estimote LTE Beacons with Bluetooth, GNSS and LTE-M/NB-IoT

LTE Beacon specification

To create this new device from Estimote we have integrated the best Internet of Things components, designing the most robust beacon the industry has ever seen. Below, you can find the full specification and tech details of the radio and other IoT components we have used.

LTE-M device with Bluetooth 5

PROCESSOR AND MEMORY
It has a low-power 32-bit ARM Cortex-M4 CPU with floating point unit (FPU) running at 64 MHz. There is 1MB flash with cache onboard and 256KB RAM supporting over-the-air (OTA) firmware updates. There is an additional ARM CryptoCell co-processor with a full AES 128-bit suite as well as a true random number generator for full entropy and asymmetric/symmetric hashing cryptographic services.

BLUETOOTH RADIO
We have integrated one of the newest 2.4 GHz radios. It fully supports the latest Bluetooth 5.0 standard including mesh networking, long range, and high data throughput. The radio could also support 802.15.4-based protocols such as Thread and ANT. There is an additional amplifier (+20 dB) for extended range of packet advertising (200m).

SATELLITE POSITIONING
The device has a low-power satellite signal receiver supporting American GPS, European Galileo, Russian GLONASS, Chinese BeiDou, and Japanese QZSS. It uses multi-constellation algorithms for fast and accurate fixes using all visible satellites.

LTE CONNECTIVITY
Cloud connectivity is possible using a low-power LTE IoT modem equipped with an ARM Cortex A7 (1.3 GHz) and supporting 5G-ready protocols such as LTE Cat-M1 and Cat-NB1. The peak data upload speed to the cloud is 375 KBps for LTE-M and 60 KBps for NB-IoT. The modem supports eDRX and PSM sleep cycles to reduce power consumption while enabling cloud-invoked communication with the device. Modem and GSM antenna supports 15 bands (B1/B2/B3/B4/B5/B8/B12/B13/B18/B19/B20/B26/B28/B39) that cover virtually the entire world.

OTHER COMPONENTS

  • Lithium-Ion rechargeable battery lasting 2 years on default settings
  • USB-C compatible with USB 2.0 for fast charging
  • NFC-A programmable tag supporting NFC Type 2 and Type 4
  • 3-axis accelerometer
  • Programmable push button for specific use-cases such as alerts
  • Programmable RGB LEDs
  • Temperature sensor
  • Integrated ultra-strong adhesive layer
  • Mounting hole for industrial deployments
  • Durable, non-toxic silicone enclosure

How does the LTE Beacon work?

This LTE-M device can be attached to an asset, e.g. a jet engine manufactured in a factory. When it moves across the production line, the LTE Beacon scans for Bluetooth beacons installed in the factory and reports its precise indoor location to the cloud. When loaded into a truck, it continues to report its outdoor position using satellite systems. It can also report key telemetry data such as temperature, vibration, and battery status.

Indoor to outdoor tracking with Estimote Bluetooth and LTE-M beacons

When the jet engine arrives at a warehouse, it switches back to beacon-tracking for precise indoor positioning. And finally, when the product gets shipped to the end-customer it can automatically report a secure “proof of delivery” signal.

The above use case is just one example of how the LTE Beacon can be programmed to work. We have designed an entirely new way of adapting the device to support many Internet of Things applications.

Programmable beacon and micro apps

Our previous generation of beacons had really only one “app” installed—our embedded firmware. It exposed some of the settings such as range, compatible packets (iBeacon or Eddystone) or other parameters. But it wasn’t possible for our customers to “upload” their own software into the device.

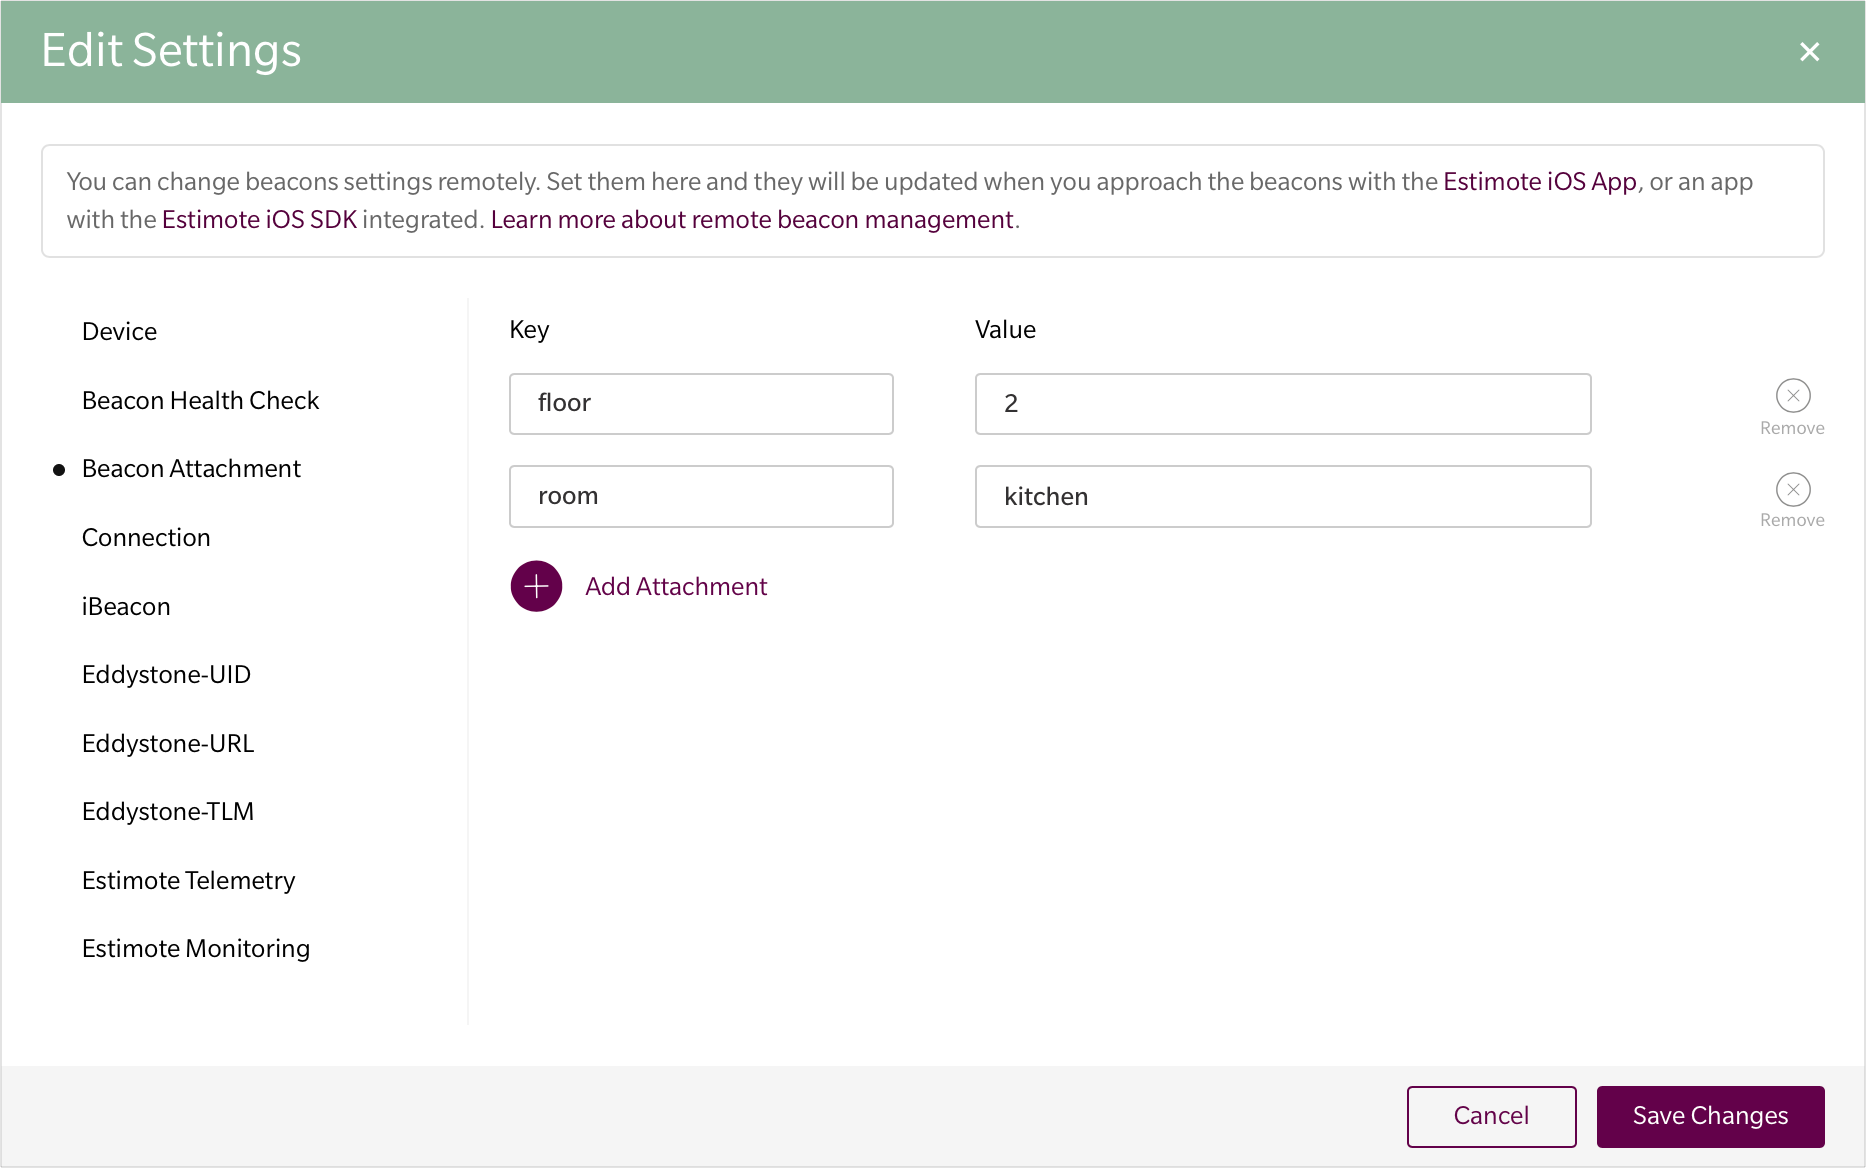
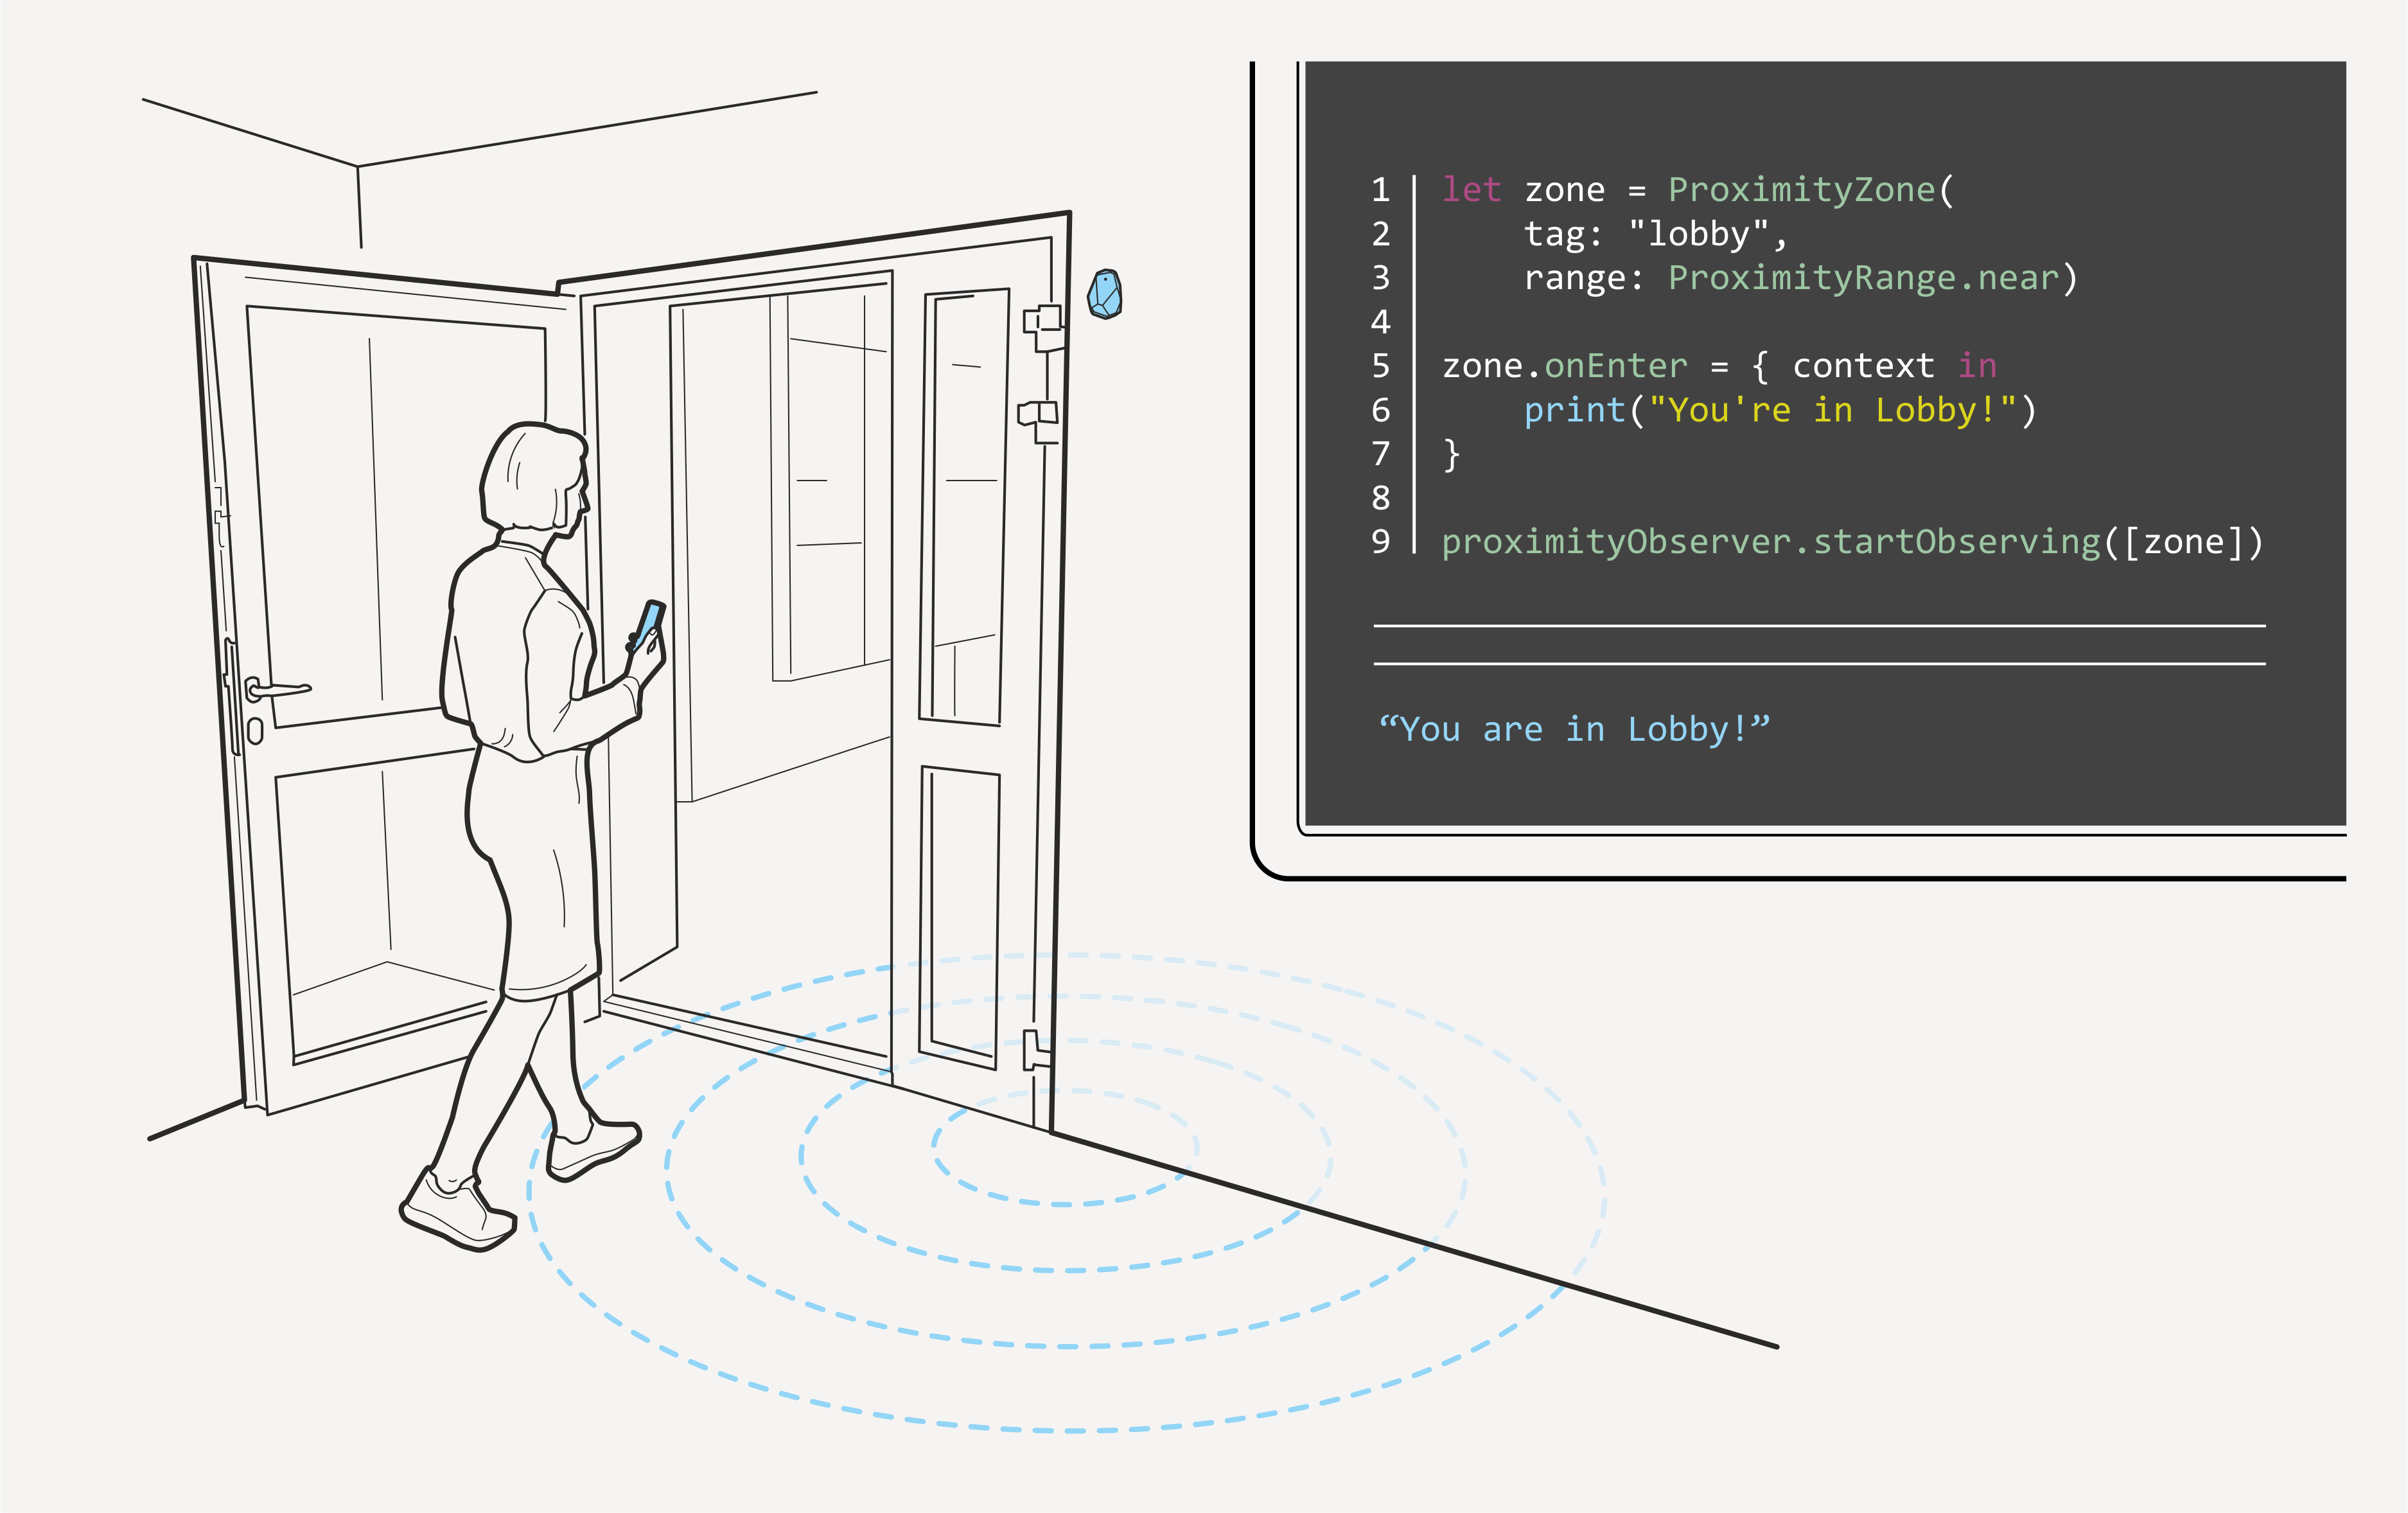
The new Estimote LTE Beacon is different. We created a web-IDE in Estimote Cloud where you can program it using JavaScript. We’re exposing a bunch of APIs for you to use in the process: BLE scanning & advertising, sending & receiving data to/from Estimote Cloud, obtaining GPS coordinates, reading from on-device sensors, responding to the button press, etc.

Programming Estimote LTE beacon with Web Bluetooth

When you’re done, Estimote Cloud will compile the code into a “micro-app,” and send the bytecode to the LTE beacon, where it starts being executed.

For example, if we want to program the LTE Beacon to use its Bluetooth radio to advertise both iBeacon and Eddystone at the same time, we can upload the micro app code below.

// Define your iBeacon packet
var iBeaconPacket = ble.build.iBeacon('DE4E12E7-7E0F-4A6B-A4DD-AA837507FB20', 2000, 18);
// Define your Eddystone-URL packet
var EddystonePacket = ble.build.eddystoneURL('https://estimote.com');

// Start Bluetooth LE advertising
ble.advertise(iBeaconPacket);
ble.advertise(EddystonePacket).interval(500).power(4);

Here is another example. This one will detect if the central button on the device was pressed, read the GPS position, and send it over to Estimote Cloud over LTE-M or Narrowband.

function sendPosition() {
  var { latitude, longitude } = location.getLastPosition();
  cloud.enqueue('position-update', { lat: latitude, lon: longitude });

Lambda expressions

To accelerate the back-end prototyping and enable developers to quickly process the data received from the LTE device, we have also added an element of serverless architecture.

Estimote Web IDE

In addition to the micro app code, you can write another JavaScript snippet—this time, a function that sits in Estimote Cloud, and processes the data received from the LTE beacon.

For example, if you want to create a “panic button” application which uses Twilio to send a text message whenever the button is pressed on the LTE-M device, here is an example micro app code and additional lambda expression.

io.press(io.button.MAIN, () => {
  // send an 'alert' event to Estimote Cloud
  cloud.enqueue('alert');
});

// Your Account Sid and Auth Token from twilio.com/console
const accountSid = '…';
const authToken = '…';
const twilio = require('twilio')(accountSid, authToken);

module.exports = async function(message) {
  // respond to the 'alert' event
  if (message.type === 'alert') {
    await twilio.messages.create({
      body: 'There's been an alert…',
      to: '+1…',
      from: '+1…',
    });
  }
};

IoT app templates

We call a pair of these two JavaScript snippets an “IoT Application,” and we have prepared a few templates you can choose from when adding a new IoT App in Estimote Cloud. With these templates, it will be possible to quickly turn the device into a GPS tracker, a cloud beacon, or a location-aware panic button.

IoT apps for Estimote Narrowband beacon

There will be a separate blog on How the LTE Beacon can be programmed, so you can learn more about the entire process there.

LTE-M device battery life

Since this LTE Beacon is fully programmable, battery life will depend on the micro app, the intensity of the radio usage, and also the external environment such as distance to base stations, type of connection (LTE Cat M1 or Narrowband IoT) and visibility of satellites.

For example, if we program the device to act as a GPS tracker and do nothing else other than send GPS coordinates to the cloud once a day, it will last approximately 2 years. However, if we want to get real-time position of an asset and receive GPS updates every few seconds, the device will last a few days at most.

The rule of thumb is that:

  • Bluetooth advertising (iBeacon/Eddystone) consumes the least power
  • Scanning for Bluetooth devices consumes significantly more energy
  • Processing satellite signals is even more power-hungry
  • And finally scanning and sending data over the LTE-M and Narrowband networks drains the battery the most. Note that it is still a fraction of the energy needed for cloud communication using classic voice or data sent over 3G

As part of our Cloud-based IDE, we are working on a battery usage profiler, so we will be able to help developers predict the battery consumption of their apps.

Estimote LTE Beacon also has a USB-C port and a rechargeable battery built-in, so it can be powered or recharged when necessary for applications that require a constant cloud connection or scanning.

Pricing and availability

Estimote LTE Beacons are ready to be ordered and we will start shipping the first batches before the end of September. We will ship on a first-come, first-served basis.

We will ship them in Developer Kits. Each box will include two devices and the total cost will be $129 + shipping. We can ship anywhere in the world.

Since the LTE Beacons talk to the LTE networks of our telecommunication partners and also use our cloud services, there will be an additional subscription fee. For the beacons in the dev kit, it will be $2 per device per month, and the first 3 months are free. The devices can be still used and programmed without an active subscription, but the cloud connectivity won’t be possible.

Estimote LTE Cat M1/NB-IoT beacons with Bluetooth and GPS

Order Dev Kit with 2 LTE beacons for $129

Beacons are shipped with a free 3-month subscription plan
We will start shipping the first batches in September.

Already piloting with the customers in the US and Europe

We have already supported customers building their IoT apps using this new technology and deployed in key markets. If you don’t want to wait until Dev Kits are shipped and want to pilot sooner please send us an email to Contact us

Get ready for iOS 13: Bluetooth and location changes explained

$
0
0

iOS 13, coming later this fall, will introduce some changes to the location permissions, as well as a brand-new Bluetooth permission. If you’re an app developer using Estimote beacons, iBeacon, or Estimote SDKs, these are likely to affect your app. Let us walk you through what’s changing, and how to adapt to it.

We’ll do this in an order that we think paints the most complete picture of the changes:

  1. Core Location and iBeacon,
  2. Core Bluetooth,
  3. Estimote Proximity SDK (which uses a mix of Core Bluetooth and Core Location),
  4. Estimote Fleet Management SDK (which uses Core Bluetooth).

There’s a lot to go through, so if you’re an Estimote Proximity SDK user and short on time, feel free to jump straight to “Action points for Estimote Proximity SDK users”.

1. Core Location and iBeacon

First of all, something we think is worth emphasizing. If your app uses iBeacon via the Core Location framework built into iOS, you’re only affected by the Core Location changes, and you actually won’t see the new Bluetooth prompt at all.

“But iBeacon is Bluetooth!” That’s correct, but … iBeacon is also somewhat special, precisely because it’s part of Core Location and not Core Bluetooth. Just like playing audio via Bluetooth doesn’t require the new Bluetooth permission (because it uses audio APIs, and not the Bluetooth API), neither does iBeacon (because it uses location APIs, and not the Bluetooth API).

That said, there are changes to some of the Core Location behavior. Let’s go through them first, and we’ll provide action points at the end.

Allow once

There’s a new option for the location prompt: “allow once”. It grants location powers to the app for a single foreground session only. When the user leaves the app or locks the smartphone, the permission will automatically expire, and the app will need to ask again next time.

Changes to the background location opt-in

Today, apps can choose to prompt the user for the background location permission (also known as “always” or “even when not using the app”) right away. In iOS 13, if your app requests the “always” permission, the initial pop-up won’t actually include such an option—the choices for the user will be “just once”, “when in use” or “never”.

If the user agrees to “when in use”, then at some point in the future when your app would normally obtain a background location event (for example, an “enter” beacon region event), the user will be presented with an option to upgrade the permission to “always”. If they do, your app will receive the background event.

That’s a somewhat simplified version—there’s actually a good amount of nuance to this new flow:

  • the “upgrade permission” pop-up might be delayed if the smartphone is locked or the user is busy with another app

  • the background event might not be delivered if the pop-up gets delayed so much that the event is no longer relevant

  • all this time your app will “believe” that it actually has the “always” permission—thanks to the new concept of “provisional” permissions

If you want to dive deeper into all this, we recommend watching the first 10 minutes of the “What’s new in Core Location” session.

Background location usage map

The periodic “app X has been using your location in the background, are you still okay with that?” pop-up will now show a map of places where the app accessed location data.

This is actually a pretty interesting addition, as it allows the user to confirm that, for example, your museum-tour app only uses their location when in the museum, which helps build trust and prevent opt-outs.

No more background-exclusive methods

Up till iOS 13, certain location methods required the “always” permission, and wouldn’t work at all without it—even if the app was in the foreground. In the context of iBeacon, that includes the “region monitoring”, AKA geofencing, AKA enter and exit events. Maybe your app only needed the enter and exit events in the foreground, with the “when in use” permission—but that wasn’t an option.

Starting with iOS 13, all location methods will work depending on the location permission. Which means you can now use region monitoring in the foreground, with just the “when in use” permission.

Ah, much better and simpler, isn’t it!

Action points for Core Location users

The most important takeaway from the Core Location changes in iOS 13 is that the location permissions for your app might be changing a lot more than before. The new “just once” permission will grant your app “when in use” access, but it’ll automatically expire after one session, and you need to be ready for that. The new “always” opt-in flow might also mean that you’ll see a downgrade from the provisional “always” authorization.

  • Most likely, you’re already implementing the didChangeAuthorization method in your CLLocationManagerDelegate, and are handling changes to the location permission—even today, users can always change this permission in the Settings app, and you want to be ready for that. So for iOS 13, simply give your didChangeAuthorization a good look, and consider what will happen when the permissions change in these new ways.

  • For the new background opt-in flow, if your app’s copy or images reference the “always allow” option that used to be available right away, you may need to adjust that to the new, 2-step process.

  • Due to the new background-usage map, you might also want to double-check that your app only accesses the location data in the intended places, or you risk losing the user’s trust, and with it, your background-location-access privileges. This might mean relying more on geofencing (region monitoring), and less on continuous or significant location updates.

2. Core Bluetooth

Since the very beginning of Core Bluetooth, scanning for Bluetooth devices (including non-iBeacon beacons; iBeacon is filtered out of Core Bluetooth), and interacting with Bluetooth accessories, didn’t require any special permission from the user.

Apps are required to explain their Bluetooth usage under the NSBluetoothPeripheralUsageDescription key in their Info.plist file (= internal metadata), but that description was for the App Store review team only, and never actually shown to the user.

If you forget the `NSBluetoothPeripheralUsageDescription` in your Info.plist file, expect this automated email in your inbox when uploading your app to the App Store. Happens even to the best of us! ;-)

If an app wanted to access Bluetooth in the background, it also needed to indicate so in their Info.plist … which meant even more scrutiny from the App Store review team, but still no transparency for the end-user.

The problem here is that this allowed apps to potentially devise some information about the user’s location from the Bluetooth signals, without the user really knowing about it. For example, an app could scan for Bluetooth signals from your smart TV, to know that you’re probably at home. Or, an app could use non-iBeacon beacons deployed, say, in a store, to know when you enter that store. (Estimote Proximity SDK doesn’t allow such “silent” operation, but more on that later.)

iOS 13 will make Bluetooth usage more transparent, with the new “allow this app to use Bluetooth?” prompt. It’ll pop up automatically the first time your app instanties any of the Core Bluetooth managers—for example, the CBCentralManager.

There’s also a new key for the Info.plist file: NSBluetoothAlwaysUsageDescription, which you can use to explain how and why your app uses Bluetooth. In contrast to the existing NSBluetoothPeripheralUsageDescription, the new description will be shown as part of the new pop-up, and also in the Settings app on the Bluetooth Privacy screens.

Action points for Core Bluetooth users

  • Craft and add the new NSBluetoothAlwaysUsageDescription message to explain Bluetooth usage to the users of your app.

  • If you’re creating any CBCentralManager objects yourself, investigate whether you need to move them to a different spot in your code, to avoid triggering the Bluetooth-permission pop-up prematurely.

  • Update your centralManagerDidUpdateState delegate to properly handle the unauthorized state. For example, disable any Bluetooth-dependent features in your app, and inform the user how they can re-enable this permission via the iOS Settings app.

3. Estimote Proximity SDK

For your generic iBeacon and Bluetooth needs, there’s Core Location and Core Bluetooth. At Estimote, we also have our own “Proximity SDK”, tightly integrated and fine-tuned to take full advantage of our entire beacon stack, from hardware, to firmware, to cloud. This allows us to provide features like software-defined range, unlimited zones/regions, and improved responsiveness and reliability. Under the hood, we use both Core Location and Core Bluetooth, and both iBeacon and non-iBeacon protocols.

Most importantly though, ever since the Proximity SDK graduated out of beta, we’ve been strictly enforcing the location permission. Even though a lot of our SDK is powered by Core Bluetooth, it will refuse to function at all without appropriate Core Location permission (“when in use” for foreground events, “always” for background). We believe that the user always needs to know when an app gains access to its location, whether via Core Location (GPS, WiFi, cell towers, iBeacon) or via Core Bluetooth (non-iBeacon beacons, or other Bluetooth signals).

New in iOS 13 is that beside the location prompt, the Proximity SDK will also trigger the new Bluetooth prompt. Both permissions are required for the Proximity SDK to function. And we still obey the “when in use” and “always” distinction, even though the iOS 13 Bluetooth prompt doesn’t actually have “when in use” (it’s “always” or “never”). We believe this actually makes the Proximity SDK one of the most privacy-respectful beacon libraries out there—on par with Apple’s own, high standards for the iBeacon opt-in.

Action points for Estimote Proximity SDK users

All in all, if you’re using the Proximity SDK, there’s a good chance you’re already well-prepared for iOS 13. The location permission requirement enforced by the Proximity SDK means that you probably already invested in good onboarding, and are explaining the location and Bluetooth usage in order to improve the opt-in rate.

Example custom-designed permissions dialog, including notifications, location, and Bluetooth.
  • There will be a new Bluetooth prompt, so if you don’t mention Bluetooth right now during onboarding (for example, to encourage users to keep it on), you may want to add that. You also need to add NSBluetoothAlwaysUsageDescription to your Info.plist file, with the message that will be shown in the Bluetooth pop-up.

  • Examine where you create your ProximityObserver, since that’s what triggers the new Bluetooth prompt. You may need to adapt your code to avoid creating the Observer before the onboarding is complete—otherwise, the prompt might show up during some less-than-ideal time, like … immediately on the first launch :-)

  • If you’re using the Proximity SDK in the background, you’re also affected by the new background location opt-in. The user will now be shown “when in use” option only at first, and “upgrade to always” option later when they’re in range of beacons. If your onboarding currently guides the user to choose the now-removed “always” option in the initial dialog, you will need to tweak your copy and/or visuals.

  • If you’re using CBCentralManager and/or CLLocationManager and their delegates to monitor permission changes, you may also want to refer to the Core Location and Core Bluetooth action points above.

4. Estimote Fleet Management SDK

Estimote Fleet Management SDK is primarily for applying any “pending settings” from Estimote Cloud to your Estimote beacons. It uses Core Bluetooth only*, and instantiating most of its classes will now trigger the Bluetooth prompt. Just like with the Proximity SDK and the ProximityObserver, you may want to adapt your code to make sure this doesn’t happen until after the onboarding.

* There are certain features in the Fleet Management SDK, inherited from our older “Estimote SDK”, which use Core Location and iBeacon. These select features (e.g., the ESTBeaconManager) have been superseded by the Proximity SDK, but if you’re still using them, you might be affected by the Core Location and iBeacon changes as well.

Let’s share notes

If you’re beta-testing iOS 13, feel free to drop by Estimote forums. We’ll be happy to discuss the changes, explain things in more detail, answer your questions, and compare notes.

Piotr Krawiec (@heypiotr), Estimote’s Developer Experience Aficionado

AI Beacon brings inch-level positioning with UWB radio and inertial module you can teach

$
0
0

In September 2018 we announced our LTE Beacon. It was the first Bluetooth beacon with low-power cellular connectivity, fully programmable in JavaScript.

It quickly became an amazing platform for rapid prototyping of IoT apps. Our customers programmed it to act as Bluetooth gateways that can scan for other beacons, as GPS trackers, panic buttons, and more.

With embedded Bluetooth 5 and GPS it enabled both indoor and outdoor vehicle or asset tracking applications, with an average accuracy of a few meters.

New beacon and inch-level tracking with UWB

Today we are pleased to announce a new version of our programmable beacon. It has an additional Ultra-Wide Band radio (UWB). It allows sub-10-cm location accuracy between two UWB-enabled devices using a time-of-flight technology.

image

To push the positioning precision even further, we have added an intelligent Inertial Measurement Unit (IMU). It has an on-chip Machine Learning Core, which makes the beacon teachable. That’s why we call our new beacon the AI Beacon.

The AI Beacon and gesture monitoring with an intelligent IMU

In addition to a 3-axis accelerometer and a 3-axis gyro, the inertial module has Machine Learning Processor baked into the sensor itself. It allows the beacon to be trained to count steps or detect specific motion gestures such as bump, free fall, pick up, tilt or any other gestures fueled by inertia measurements.

The IMU is always turned on and consumes very little power while the other components are turned off. Once a gesture is detected, the AI Beacon wakes up the other components and performs pre-programmed actions—e.g., sends an alert over LTE or NB-IoT. This event-based approach can massively reduce power consumption of the entire beacon. Power consuming radios such as GPS, cellular or UWB can be activated only when a specific gesture is detected.

The full specification of Estimote AI Beacon

The new AI Beacon from Estimote is packed with state of the art IoT technologies. It has all the key wireless chips and sensors you need to build the next generation apps for the physical world.

image

Key technologies available on AI Beacon:

  • LTE-M / NB-IoT / EGPRS modem
  • Global cellular connectivity, active out of the box
  • GPS / Galileo / GLONASS / BeiDou / QZSS GNSS
  • Bluetooth 5 radio
  • UWB radio
  • 64 MHz ARM ® Cortex™ M4 CPU with FPU
  • 16 Mb flash memory
  • 3-axis MEMS accelerometer
  • 3-axis MEMS gyroscope
  • Programmable button
  • Programmable RGB LEDs
  • Rechargeable lithium-ion battery
  • USB-C
Pre-order Dev Kit with 2 AI Beacons for $149

Beacons are shipped with a free 3-month subscription plan

Indoor Location using UWB positioning

For outdoor tracking the AI Beacon can use GPS signals or cell tower triangulation. For indoor location it can use nearby Bluetooth beacons for precision down to a few meters, or UWB beacons for inch-level precision.

image

The UWB radio will support two different modes. In the first one, at least three AI Beacons should be connected to power using USB-C and installed as anchors in the room corners. The fourth AI Beacon can be mobile and attached to a vehicle, e.g., a forklift. It will keep ranging nearby UWB anchors and, based on received signals, will compute its own position in real-time. This precise position can be sent to cloud using LTE, or processed by the micro-app installed on the AI Beacon.

In this scenario both anchors and the vehicle beacon should be connected to power using USB-C, since UWB radio will be consuming a significant amount of power.

image

There is also another scenario where at least four UWB anchors are installed in the corners and powered with USB-C. This time, the mobile AI Beacon can be programmed to act as a low-power UWB Tag. It can be attached to an asset and will keep sending tiny UWB signals. Powered UWB anchors on the walls nearby will pick up the signals and relay them to our cloud to compute the precise position of the tag. Then, you can subscribe to receive real-time location updates from our cloud API.

In this scenario, UWB Tags can last years on a single charge. This setup is perfect for high-precision asset tracking, e.g. pallets or animals.

Programming the AI Beacon with Web IDE and JavaScript

Just like the LTE Beacon, the AI Beacon is programmable in JavaScript using Estimote Web IDE. All you need is an internet browser with Web Bluetooth support. The beacon exposes a large collection of JavaScript functions (an API) to control all the radios and sensors. When it is time to deploy, Estimote Cloud will compile the code into a binary, and flash it to the beacon over Bluetooth or cellular connection.

The new AI Beacon features, UWB positioning and smart IMU, are programmable in the very same way, with UWB and IMU functions joining the beacon’s JavaScript API.

image

If you want to see the process of programming the beacon in action, watch our 4-minute video-tutorial. In the video, we build an app that sends a text message with Twilio whenever the button on the beacon gets pressed:

IoT app templates

With all the radios and sensors included in the AI Beacon, and its rich JavaScript API, there is a lot to explore. To make this easier, we have built many IoT app templates to show what you can do with the beacon, and also how to do it.

They range from simple code snippets to help learn the basics, to more complete examples with beacon (micro-app) code, backend (cloud) code, and integrations with 3rd-party APIs.

image

The templates are well-commented, explaining the APIs and functions they use, and recommending some best-practises. They are also designed to be easily tweakable, so that you can adapt them to your needs, or even mix-and-match code snippets from multiple templates.

Pre-order AI Beacons today

The new AI Beacon can be pre-ordered today. We will start shipping the first batches in October. We can ship to anywhere in the world, and we will do it on a first-come, first-served basis. We only charge the moment we ship.

There will be two devices in the box and there is a free, 3-month subscription plan included. The cellular connectivity will be active out of the box. After three months, we will charge Developer Subscription fee of $2 per device per month.

Note that you can keep using the AI Beacon without an active subscription, but the cloud connectivity won’t work. You will be able to program the beacon over Bluetooth and access all the features except cellular connectivity.

Pre-order Dev Kit with 2 AI Beacons for $149

Beacons are shipped with a free 3-month subscription plan

image

IoT prototyping platform and Estimote Software

We believe the new AI Beacon from Estimote with its rich wireless technologies will be an outstanding tool for rapid prototyping of different Internet of Things apps.

If you want us to help with your idea, we are also more than happy to allocate our engineers and engage in Proof-of-Concept/Pilot projects—contact our Customer Success team to learn more about PoC packages.

Once you are ready with your prototype, we can also help with volume manufacturing and custom form-factor products that use the same software stack, but are optimized for specific use-cases.

image

Contact our Customer Success Team by emailing: business (at) estimote (dot) com.

Parked car detection made easy — magnetometer support in Estimote Beacons

$
0
0

We think of Estimote Beacons as the building blocks of physical location intelligence. We put a lot of stock in sensors that collect relevant ambient information for their surroundings. These sensors are the cornerstones of data driven decisions for intelligent indoor spaces. One of these sensors is a magnetometer, which enables some very interesting use cases.

Diagram

On one level, having a magnetometer means you can easily check if the beacon is installed properly — many sources of interference will also impact the magnetic field around the beacon. You can leverage this sensor for a smoother, more reliable deployment. In addition, you can also use the ambient magnetic fields to record a “fingerprint” of the location, making sure it can’t be spoofed, and adding another layer of sensors to your intelligent location arsenal.

For a while now, Estimote Location Beacons have had magnetometers installed. We’ve included magnetometer readings in our Estimote Telemetry packet due to popular demand, but we haven’t really put that feature in the spotlight before. It’s time to change that.

What is a magnetometer?

A magnetometer is a device that can measure changes in the magnetic field. It can be easily used as magnetic metal detector. The appearance of a chunk of magnetic material nearby is one of the most common reasons for changes in the magnetic field. Why a “magnetic metal,” and not just any metal, like with a metal detector? Magnetometers are different from metal detectors, since the latter can detect all metals — while magnetometers can only detect a special group of metals (i.e. magnetic metals) such as iron, nickel, cobalt, or their alloys, like steel.

Some of the larger-scale applications for magnetometers include searching for sunken ships, submarines, or underground structures — useful for those of you with archeological inclinations! Most of us probably won’t be diving for doubloons, though. If you set out north to watch the northern lights, though, magnetometers can be used to detect indications of auroral activity before the actual light show begins. In spacecraft, one of the more common uses for magnetometers is altitude sensing. Closer to home, magnetometers are also sometimes used in airports to scan for concealed weapons.

A big difference between a magnetometer and a metal detector is the scope: detectors typically have a shorter range, while magnetometers can detect large magnetic objects from several dozen feet away. The question “What’s a large object made of iron or steel that I might want to detect from quite far away?” has at least one pretty obvious answer.

Real-world uses for magnetometers

There are several, but one of the more interesting ones is very relevant in today’s world. Magnetometers are commonly used to detect the presence of cars. Some of the specific applications here include counting free spaces in car parks, measuring traffic loads by counting the number of cars passing on a given fragment of the road, creating adaptive traffic lights, and more.

Let’s imagine a multi-floor car park with hundreds of parking spaces. When you’re desperately trying to find a free space to make it in time for the movie, wouldn’t it be cool to be able to quickly find a spot? If you have beacons placed in each of the parking spaces, they can detect if a car is occupying that space or not, and send that data to a server that can then feed your phone (or the digital display in the parking lot) data on how many free spaces there are, and where to find them.

Detect car

An added bonus? No cables, no complex installation procedures, and no need for multiple “gateways” for the beacons to send their data to the web. All it takes is one person with a phone.

How can you start using it?

With Estimote beacons, you get this type of sensor right in the palm of your hand (or on your wall, as the case may be). We know you can use it to make amazing things.

Location Beacon’s magnetometers provide you with raw readings from the sensor. You can use our iOS and Android SDKs (starting with version 4.5 and 1.0.0, respectively) to get a reading from the magnetometer in the Estimote Telemetry packet. This will provide you with the values for x, y, and z axis, corresponding to three-dimensional coordinates. For best results, you should measure the values on site, where you want to deploy the beacon (bear in mind that the results may be impacted by magnetic objects in the vicinity — even your car on the other side of the wall can change the readings).

In essence, though, this means you only need to have an app you build for this purpose running on a device somewhere in the beacon’s range to know exactly when — and for how long — a car has been in the vicinity of the beacon. That said, the beacons aren’t calibrated — don’t use them as compasses and make sure you offset each beacon’s readings individually.

Here’s how you can read that data using our Android SDK

And our iOS SDK

Grab yourself a couple of Location Beacons — and now you’re ready to go out and find some buried treasure (provided they’re big enough)!

Rafał Ociepa, Community Manager at Estimote

Marcin Klimek, Product Manager at Estimote

AI Beacon brings inch-level positioning with UWB radio and inertial module you can teach

$
0
0

In September 2018 we announced our LTE Beacon. It was the first Bluetooth beacon with low-power cellular connectivity, fully programmable in JavaScript.

It quickly became an amazing platform for rapid prototyping of IoT apps. Our customers programmed it to act as Bluetooth gateways that can scan for other beacons, as GPS trackers, as panic buttons, and more.

image

With embedded Bluetooth 5 and GPS it enabled both indoor and outdoor vehicle or asset tracking applications, with an average accuracy of a few meters.

New beacon and inch-level tracking with UWB


Today we are pleased to announce a new version of our programmable beacon.
It has an additional Ultra Wideband radio (UWB). It allows sub-10-cm location accuracy between two UWB-enabled devices using time-of-flight technology.

To push the positioning precision even further, we have added an intelligent Inertial Measurement Unit (IMU). It has an on-chip Machine Learning Core, which makes the beacon teachable. That’s why we call our new beacon the AI Beacon.


The AI Beacon and gesture monitoring with an intelligent IMU


In addition to a 3-axis accelerometer and a 3-axis gyro, the inertial module has Machine Learning Processor baked into the sensor itself. It allows the beacon to be trained to count steps or detect specific motion gestures such as bump, free fall, pick up, tilt or any other gestures fueled by inertia measurements.

The IMU is always turned on and consumes very little power while the other components are turned off. Once a gesture is detected, the AI Beacon wakes up the other components and performs pre-programmed actions—e.g., sends an alert over LTE or NB-IoT. This event-based approach can massively reduce power consumption of the entire beacon. Power consuming radios such as GPS, cellular or UWB can be activated only when a specific gesture is detected.


The full specification of Estimote AI Beacon


The new AI Beacon from Estimote is packed with state of the art IoT technologies.
It has all the key wireless chips and sensors you need to build the next generation apps for the physical world.

image


Key technologies available on AI Beacon:


- LTE-M / NB-IoT / EGPRS modem
- Global cellular connectivity, active out of the box
- GPS / Galileo / GLONASS / BeiDou / QZSS GNSS
- Bluetooth 5 radio
- UWB radio
- 64 MHz ARM ® Cortex™ M4 CPU with FPU
- 16 Mb flash memory
- 3-axis MEMS accelerometer
- 3-axis MEMS gyroscope
- Programmable button
- Programmable RGB LEDs
- Rechargeable lithium-ion battery
- USB-C


Indoor Location using UWB positioning


For outdoor tracking the AI Beacon can use GPS signals or cell tower triangulation.
For indoor location it can use nearby Bluetooth beacons for precision down to a few meters, or UWB beacons for inch-level precision.

image

The UWB radio will support two different modes. In the first one, at least three AI Beacons should be connected to power using USB-C and installed as anchors in the room corners. The fourth AI Beacon can be mobile and attached to a vehicle, e.g., a forklift. It will keep ranging nearby UWB anchors and, based on received signals, will compute its own position in real-time. This precise position can be sent to the cloud using LTE, or processed by the micro-app installed on the AI Beacon.

In this scenario both anchors and the vehicle beacon should be connected to power using USB-C, since the UWB radio will be consuming a significant amount of power.


image


There is also another scenario where at least four UWB anchors are installed in the corners and powered with USB-C. This time, the mobile AI Beacon can be programmed to act as a low-power UWB Tag. It can be attached to an asset and will keep sending tiny UWB signals. Powered UWB anchors on the walls nearby will pick up the signals and relay them to our cloud to compute the precise position of the tag. Then, you can subscribe to receive real-time location updates from our cloud API.

In this scenario, UWB Tags can last years on a single charge. This setup is perfect for high-precision asset tracking, e.g. pallets or animals.


Programming the AI Beacon with Web IDE and JavaScript


Just like the LTE Beacon, the AI Beacon is programmable in JavaScript using Estimote Web IDE. All you need is an internet browser with Web Bluetooth support. The beacon exposes a large collection of JavaScript functions (an API) to control all the radios and sensors. When it is time to deploy, Estimote Cloud will compile the code into a binary, and flash it to the beacon over Bluetooth or cellular connection.

The new AI Beacon features, UWB positioning and smart IMU, are programmable in the very same way, with UWB and IMU functions joining the beacon’s JavaScript API.

image

If you want to see the process of programming the beacon in action, watch our 4-minute video-tutorial. In the video, we build an app that sends a text message with Twilio whenever the button on the beacon gets pressed:

https://www.youtube.com/embed/UvTvzO5YstQ


IoT app templates


With all the radios and sensors included in the AI Beacon, and its rich JavaScript API, there is a lot to explore. To make this easier, we have built many IoT app templates to show _what_ you can do with the beacon, and also _how_ to do it.

They range from simple code snippets to help learn the basics, to more complete examples with beacon (micro-app) code, backend (cloud) code, and integrations with 3rd-party APIs.

image

The templates are well-commented, explaining the APIs and functions they use, and recommending some best-practices. They are also designed to be easily tweakable, so that you can adapt them to your needs, or even mix-and-match code snippets from multiple templates.

image


IoT prototyping platform and Estimote Software


We believe the new AI Beacon from Estimote with its rich wireless technologies will be an outstanding tool for rapid prototyping of different Internet of Things apps.

If you want us to help with your idea, we are also more than happy to allocate our engineers and engage in Proof-of-Concept/Pilot projects—contact our Customer Success team to learn more about PoC packages.

Once you are ready with your prototype, we can also help with volume manufacturing and custom form-factor products that use the same software stack, but are optimized for specific use-cases.

image

Contact our Customer Success Team by emailing business@estimote.com.

Viewing all 184 articles
Browse latest View live


Latest Images